After the disaster of trying to make a planter from stepping stones, I went back to looking for a planter for the yard that Lucky could pee on (instead of the yard plants, which were dying).
I found a cute lime green planter at Home Depot for about $20. It's plastic, so it's lightweight and should hold up better to accidents (like being dropped).
One big problem is that it didn't have any drainage holes.
Not a problem for long! I pulled out my drill and made a few holes in the bottom. It seriously took all of two minutes.
The only thing with drainage holes like this, is that they sometimes get plugged up with sediment or soil.
Again, not a problem for long! I just unfolded a coffee filter into the bottom. If it can strain coffee out, I'm sure it can do the same for sediment and soil! Plus it won't hurt the plants and will probably just become mulch eventually. And, can we say CHEAP?
So, I drilled holes, added a coffee filter, then finished it off with good potting soil and plants. I used orange begonias - they do well where I live, are very hardy, and make a nice pop of color.
{Y'all, when my parents see this post, they are going to say, "Begonias! Bonnie HATES begonias!" And they're right, sort of. I really hated the look of begonias for a long time, and still don't really like them close up. But from a distance, they're OK. Plus all those other things I mentioned about about being hardy and colorful.}
Now we just have to train the dog to pee on it...
This blog shares the triumphs and speedbumps of my "projects", from cooking and crafting to remodeling.
Friday, May 17, 2013
Thursday, May 16, 2013
Hydrangea Cupcakes
Today it's time for cupcake #3! (Cupcake #1 was Raspberry Lemonade and Cupcake #2 was Triple Chocolate)
These are essentially a vanilla cupcake with fancy frosting, but they were light, fluffy, and delicious! I thought these would be the "wah-wah" of the three cupcakes, but many people told me they were their favorite! I guess you don't have to have fancy flavors to be good :)
Ingredients:
Method:
This recipe made about 12 regular and 24 mini cupcakes, and took about an hour of time in total (but I had to wash lots of dishes in between).
Don't be scared of icing bags! They really are quick and easy, and people think you have amazing talent!
These are essentially a vanilla cupcake with fancy frosting, but they were light, fluffy, and delicious! I thought these would be the "wah-wah" of the three cupcakes, but many people told me they were their favorite! I guess you don't have to have fancy flavors to be good :)
![]() |
| via |
Ingredients:
- 1 box white cake mix
- Eggs (do what it says on the box)
- Oil (do what it says on the box)
- Water (do what it says on the box)
- 1 c unsalted butter (2 sticks)
- 3 c confectioners sugar
- 2 T milk
- 1 T vanilla extract
- Blue and red food coloring
- Icing bag
- 2D tip
Method:
- Mix together the cake mix, eggs, oil, and water just like it says on the box.
- Fill cups and bake cupcakes exactly like it says on the box
- Let them cool
- Cream butter, milk, and vanilla extract
- Add confectioners sugar and whip until smooth
- Add more sugar or milk if needed to get desired consistency
- Divide the frosting, and make one purple and one blue
- Attach a 2D tip to your icing bag
- Glop some blue frosting in one side of the bag, and some purple frosting on the other side (it doesn't have to be perfect)
- Put little glops of frosting all over the top of your cupcakes, not leaving any space between them (this doesn't have to be perfect, either!) The blue and purple will blend nicely and make your cupcakes look like hydrangea blossoms!
- Serve on a pretty tray with a pretty label (it's all about the presentation!)
This recipe made about 12 regular and 24 mini cupcakes, and took about an hour of time in total (but I had to wash lots of dishes in between).
Don't be scared of icing bags! They really are quick and easy, and people think you have amazing talent!
Wednesday, May 15, 2013
Project Fail: Planters from Pavers
While the glue was still wet on this project, I started writing this post...
The garden suffered a casualty over the winter: an oak-leaf hydrangea just couldn't stand up to the daily pee barrage of Lucky dog. Honestly, I don't think any plant could.
We discussed asking the city for a fire hydrant, but decided that a statue or a planter would probably be more practical. I've been shopping around for a while, but everything I like is in the $100 range, which seems a little steep for a doggie pee-spot!
Then I saw it on Pinterest - a planter made from stepping stones! It would be cheap, easy, and durable - just my kind of project.
I was up at the hardware store that same night to buy all my goodies. I got five 16" concrete step stones, a tube of Liquid Nails, a bag of potting mix, and an orange begonia, for a total of about $30 (and I still have soil and glue leftover!).
Assembling the planter went super fast - like under 10 minutes fast. I balanced the step stones on their sides, ran a line of glue down the side, and smushed them together. I overlapped each stone only once, so the sides would all be the same. I wrapped it in a bungee cord for good measure, but I bet clamps would be better.
Then I put dots of glue on the top inner edge, and smushed the fifth stone on top. You use dots of glue here so that water can drain through.
I let it dry for three days, mostly because I didn't get around to moving it sooner.
Then....
I talked Tommy into moving it for me...that sucker was HEAVY! About two steps into the garden, it crumbled. Thankfully Tommy jumped out of the way and wasn't hurt.
So...definite project fail here. Planters made from stepping stones = NOT WORTH IT!
The garden suffered a casualty over the winter: an oak-leaf hydrangea just couldn't stand up to the daily pee barrage of Lucky dog. Honestly, I don't think any plant could.
We discussed asking the city for a fire hydrant, but decided that a statue or a planter would probably be more practical. I've been shopping around for a while, but everything I like is in the $100 range, which seems a little steep for a doggie pee-spot!
Then I saw it on Pinterest - a planter made from stepping stones! It would be cheap, easy, and durable - just my kind of project.
I was up at the hardware store that same night to buy all my goodies. I got five 16" concrete step stones, a tube of Liquid Nails, a bag of potting mix, and an orange begonia, for a total of about $30 (and I still have soil and glue leftover!).
Assembling the planter went super fast - like under 10 minutes fast. I balanced the step stones on their sides, ran a line of glue down the side, and smushed them together. I overlapped each stone only once, so the sides would all be the same. I wrapped it in a bungee cord for good measure, but I bet clamps would be better.
Then I put dots of glue on the top inner edge, and smushed the fifth stone on top. You use dots of glue here so that water can drain through.
I let it dry for three days, mostly because I didn't get around to moving it sooner.
Then....
I talked Tommy into moving it for me...that sucker was HEAVY! About two steps into the garden, it crumbled. Thankfully Tommy jumped out of the way and wasn't hurt.
So...definite project fail here. Planters made from stepping stones = NOT WORTH IT!
Tuesday, May 14, 2013
Triple Chocolate Cupcakes
Today I'm back with cupcake #2! (Cupcake #1 was Raspberry Lemonade)
These came out delicious, but not so rich they were overwhelming.
These were even easier than the raspberry lemonade cupcakes! And just as delicious, but in a chocolatey way. Again, I started with a cake mix - it saves time, and for me, they just come out better.
Ingredients:
Method:
This recipe made about 12 regular and 24 mini cupcakes, and took about an hour of time in total (but I had to wash lots of dishes in between).
These came out delicious, but not so rich they were overwhelming.
These were even easier than the raspberry lemonade cupcakes! And just as delicious, but in a chocolatey way. Again, I started with a cake mix - it saves time, and for me, they just come out better.
Ingredients:
- 1 box devil's food cake mix
- Eggs (do what it says on the box)
- Oil (do what it says on the box)
- Water (do what it says on the box)
- 1 c unsalted butter (2 sticks)
- 3 c confectioners sugar
- 2 T milk
- 2 T unsweetened cocoa powder
- Chocolate garnish (I used chocolate curls)
- Icing bag
- 1M star tip
Method:
- Mix together the cake mix, eggs, oil, and water just like it says on the box.
- Fill cups and bake cupcakes exactly like it says on the box
- Let them cool
- Cream butter and milk
- Add confectioners sugar and cocoa powder and whip until smooth
- Add more sugar or milk if needed to get desired consistency
- Using a large star tip on an icing bag, make swirls on top of cupcakes (I go from the outer edge to the center)
- Top with a chocolate garnish (it's all about the presentation!)
This recipe made about 12 regular and 24 mini cupcakes, and took about an hour of time in total (but I had to wash lots of dishes in between).
Thursday, May 9, 2013
Wedding in Review: All the Projects
To wrap up the Wedding Wednesdays, I wanted to provide a wrap-up post of all the projects! I hope they've inspired you to DIY a few elements of your own wedding, whether it be to personalize, save money, or just to have something to do with friends!
PS: Friends, I still have most of this stuff, so if you'd like to borrow it for your own wedding, just ask!
The DRESS - designed by us and handmade by my Mom
My dress was a hand-beaded, Chantilly lace fit-and-flare gown with a strapless sweetheart neckline and rows and rows of flounces. It also featured a button-off removable train and beaded belt.
PS: Friends, I still have most of this stuff, so if you'd like to borrow it for your own wedding, just ask!
The DRESS - designed by us and handmade by my Mom
My dress was a hand-beaded, Chantilly lace fit-and-flare gown with a strapless sweetheart neckline and rows and rows of flounces. It also featured a button-off removable train and beaded belt.
![]() |
| Mismatched Bridesmaid Dresses |
![]() |
| Personalized Bridesmaid Robes |
![]() |
| Personalized Jewelry for Bridesmaids and Flower Girls |
| Flower Girl Dresses American Girl Dresses to Match the Flower Girls |
![]() |
| Flower Girl Baskets |
| Ring Bearer Pillow (made from leftover dress fabric) |
| Invitation Suite |
| Thank You Notes |
![]() |
| RSVP Map |
| Will You Be My Bridesmaid Paper Doll Cards |
![]() |
| Wreaths for the Chapel |
![]() |
| Hydrangea Bouquets |
![]() |
| Peony Bouquet and Ranunculus Boutonnieres |
![]() |
| Ribbon Wands |
![]() |
| Pennants |
![]() |
| Pennant Cake Topper |
![]() |
| Chair Ribbons |
![]() |
| Ribbon Table Runners |
| Coastal Centerpieces Made From Lantern, Chrome Shells, and Coral |
| Chrome Coral Table Number Holders |
![]() |
| Name Buttons |
![]() |
| Photo Guest Book |
| Cloth Napkins for Favors |
| Save-A-Guest Kit |
![]() |
| Dancing Shoes |
Labels:
fashion,
flowers,
gifts,
inspiration,
jewelry,
paper,
sewing,
stationary,
wedding,
wreath
Wednesday, May 8, 2013
Raspberry Lemonade Cupcakes
Want to hear a good love story? After losing his wife to cancer, a gentleman attended a wedding. A friend made sure to sit him next to a fascinating woman, hoping her conversational skills would help him through the night. Dinner and one dance later, he was smitten. He proposed six weeks later, and they married a mere four months after that first night!
The fun part? They met at my SIL's wedding, I know both the bride and groom, they're grandparents to teenagers, and their love has taken 10+ years off of them. I have honestly never seen two people so in love! I was touched to be invited to their wedding last weekend :)
My husband's family hosted a dinner for 50 the night before the wedding, and they asked me to do the desserts! Over the next few days, I'll share what I made.
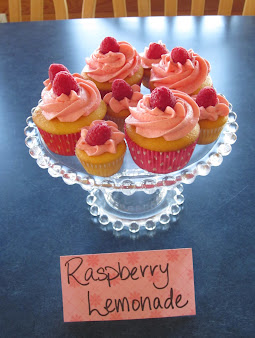
First up, raspberry lemonade cupcakes!
I know you won't believe it, but these were actually pretty darn easy. I'm not a great baker, so I like to start with a box mix and get creative from there. My scratch cakes tend to be disasters!
Ingredients:
This recipe made about 12 regular and 24 mini cupcakes, and took about an hour of time in total (but I had to wash lots of dishes in between).
Aren't these beautiful? The mini cupcakes were a huge hit! Since I had three flavors of cupcakes, folks wanted to try them all, but not in full size. That, and the frosting-to-cake ratio is much better on mini cupcakes.
The fun part? They met at my SIL's wedding, I know both the bride and groom, they're grandparents to teenagers, and their love has taken 10+ years off of them. I have honestly never seen two people so in love! I was touched to be invited to their wedding last weekend :)
My husband's family hosted a dinner for 50 the night before the wedding, and they asked me to do the desserts! Over the next few days, I'll share what I made.
First up, raspberry lemonade cupcakes!
I know you won't believe it, but these were actually pretty darn easy. I'm not a great baker, so I like to start with a box mix and get creative from there. My scratch cakes tend to be disasters!
Ingredients:
- 1 box lemon cake mix
- Eggs (do what it says on the box)
- Oil (do what it says on the box)
- Water (do what it says on the box)
- 1 T lemon extract
- 1 c unsalted butter (2 sticks)
- 3 c confectioners sugar
- 2 T milk
- 1 T raspberry extract
- 4 drops red food coloring
- 1 small box fresh raspberries
- Icing bag
- 1M star tip
- Mix together the cake mix, eggs, oil, and water just like it says on the box.
- Add lemon extract and mix into batter
- Fill cups and bake cupcakes exactly like it says on the box
- Let them cool
- Cream butter, milk, raspberry extract, and food coloring
- Add confectioners sugar and whip until smooth
- Add more sugar or milk if needed to get desired consistency
- Using a large star tip on an icing bag, make swirls on top of cupcakes (I go from the outer edge to the center)
- Top with a fresh raspberry
- Serve on a pretty tray with a pretty label (it's all about the presentation!)
This recipe made about 12 regular and 24 mini cupcakes, and took about an hour of time in total (but I had to wash lots of dishes in between).
Aren't these beautiful? The mini cupcakes were a huge hit! Since I had three flavors of cupcakes, folks wanted to try them all, but not in full size. That, and the frosting-to-cake ratio is much better on mini cupcakes.
Subscribe to:
Posts (Atom)