Wednesday, May 30, 2012

Wedding Bouquets on a Budget

I've been dreaming about beautiful wedding bouquets since we got engaged.  Peonies, garden roses, dahlias, and carnations, all tied up into big fluffy gorgeousness....

Coral Bridal Bouquets

And then I was rudely awakened.  To have someone else make 7 bouquets, 10 boutonnieres, and two corsages costs anywhere between $600 and $1000!!!  Holy smokes!  When I did one friends entire wedding (including bouquets and centerpieces) for $700 or another friends bouquets and boutonnieres for $200, I knew I was saving them money, but honestly I had no idea.

DIY Blue and White Wedding Bouquet

So for the past few days, I've been doing some creative thinking and came up with a few options:
  1. Cough up the money and pay someone else to do them (pro: easy, con: expensive)
  2. Hire a florist to do only part of the order, and do the easy parts, like boutonnieres or bridesmaid bouquets, myself (pro: less expensive, con: more work for me)
  3. Do everything myself except the bridal bouquet (pro: less expensive, con: more work for me)
  4. Do all my own flowers (pro: cheap, cons: more work for me, bouquets aren't as pretty)

I've been researching prices and options at two of my favorite online flower shops, Potomac Floral and Fifty Flowers, and have come up with some ideas.

Billy balls and hypericum are pretty pricey, and when ordering online, you often have to order more than necessary.  Making these myself would actually cost more than hiring a florist, almost $200.

Billy ball and hypericum boutonnieres

Tommy suggested just doing a traditional white rose boutonniere.  If I ordered fancy roses online, I could do them for about $150*.  However, I think I'll just buy the roses from a local grocery store.  A dozen white roses should run no more than $20.  Bargain!
White Rose Boutonniere

Now what about the bridesmaids?  The big issue everyone has with me doing them myself is that they'll be too much work.  And yes, making bouquets from a variety of flowers, especially if those flowers have thorns, does take time.  However, bouquets made of all one thornless flower should cut down on the time dramatically.  It also happens that hydrangeas are a readily available summertime flower, and are also quite affordable!  One giant hydrangea blossom, a few stems of silver dollar eucalyptus, some floral tape and ribbon, and we're ready to go!  All for about $25* per bouquet.

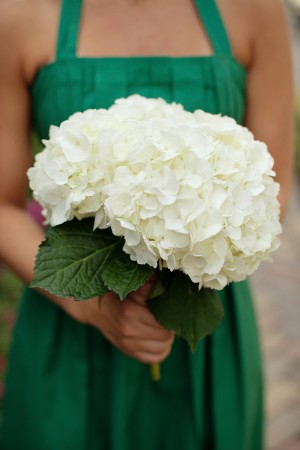
White hydrangea bouquet

And finally, my bridal bouquet.  A super simple option would be to have a larger, multi-blossom version of the bridesmaids bouquets.  I could also coordinate with them by using coral pink hydrangea.  This would cost an extra $80*, but the added pop of color just might be worth it!
Coral hydrangea blossom

And finally, using spare bits and pieces of the boutonnieres and bouquets, I'd fashion our mothers coordinating wrist corsages.

I'm also still toying around with the idea of making the boutonnieres and corsages from fabric.  Then I could finish them up weeks before the wedding!


*FYI, the reason the DIY flowers are still a little pricey is because I'll have to have them shipped to me.  If I were tying the knot at home, I'd use my local place and avoid all those shipping costs!


So chime in!  Which option would you choose?  Do you regret spending hundreds of dollars on a wedding item that lasts a day, or did you regret skimping on florals that live on through beautiful photos?

I can't wait to share the results soon!

In the end, I made all the bouquets and boutonnieres myself, but using silk flowers.  That way, I got everything finished weeks ahead of time, and for a fraction of the cost!


Tuesday, May 15, 2012

Coral Neckties

If you haven't already noticed, our wedding colors are navy and coral.  Surprisingly, it was my Dad who suggested the navy suits (we found great ones at Macy's) with white shirts!  And they look awesome!  However, good luck finding a decent coral tie.

the boys suit shopping (that tie was too bubble gum pink)

Apparently the men's fashion industry hasn't heard that coral is a hot color this year, because coral ties are nowhere to be found!  They make plenty of wonderful true-pink, red, and orange ties in a variety of shades, weaves, and prints, but no coral.

We eventually got lucky and found a handful that work, but I thought I'd share my hard-sought collection of options with you (seriously, we're talking 10+ hours of google searching for these babies).  Because I had to order 10 ties (one groom, six groomsmen, two Dads, and a ring bearer), I kept my budget under $25 per tie.  Lucky for you, most of them are even less than that!  My best advice: skip the mall, go straight to google, and order/return until you find what works!

Don't take the following the wrong way.  All the ties were great, they just didn't match the other colors we had chosen.


"Coral" ties that were a bit on the red side for us:


"Coral" ties that were a bit too orange:


"Coral" ties that were too bubblegum pink:


"Coral" tie that was too peachy:


Coral ties with patterns (Tommy decided he liked the solid ones better):


And finally, solid coral ties!  These colors all looked super with our other wedding choices.


My home experience:
These are four returns (red #2, orange #1 and #3, peach) and our final choice (coral #3)


Also, I have some great things to say about some of the companies (and they don't even know it!):
  • Solid Color Neckties has a fabulous selection with the lowest prices.  They even offer matching pocket squares, boy's ties, long ties, you name it.  And fast shipping!  Ultimately, this is who we went with.
  • The Tie Bar also has great prices and selection, with skinny, long, and boys ties (and they come recommended by our most fashionable groomsman).
  • That said, I didn't have a bad experience with any of them, so happy shopping!

You might also like these posts:
DIY Coral and Navy Wedding
Coral Bridesmaid Dresses
Coral Wedding Bouquets


Follow Me on Pinterest

Sunday, May 13, 2012

Happy Mother's Day, Mom!!!

If you've been wondering why loads of new posts have been coming out lately, it's because my Mom took time out of her life, flew all the way across the country, and spent 10 days with me to accompany me to 3 showers, finish 11 wedding projects, work on my wedding gown (that she designed and is making), and even do some fun touristy stuff.

Mom and Lucky dog at the Azalea forest, National Arboretum

As far as DIY weddings go, my Mom has been honing her skills her entire life, through her custom wedding gown business, costuming, quilting, deal scavenging, and more!  I think we've successfully put all her amazing skills to the test this year, the best one being infinite patience!

Mom working on the belt for my wedding ensemble

I really, truly don't think I could have made it through the past year without her love and support.  She's a wonderful Mom and a fantastic friend.  I'm the luckiest daughter in the world :)


I love you, Mom!!!

My surprise shower was a surprise for her, too!

Thursday, May 10, 2012

Flower Girl Hair Bows

When my Mom made the flower girl dresses, she had loads of good-size scraps left over.  Hello project!!!

Using the Clover Flower Frills size small flower template, I folded and cut out ten sets of petals, stringing them onto thread after finishing each one.  Once I had ten on the thread, I bunched them all together and secured them with several more stitches.


I sewed a few loops around the center of the barrette to anchor the flower.  I also attached a petal to each end of the barrette to made sure the metal would be covered when they wear it.


The cost for this project was just a package of 3" barrettes.  The fabric was leftover from the flower girl dresses, and the thread I already had!  Cheap, easy, and adorable.


These match the dresses and baskets, and will be super cute on wedding day!

Update: They were adorable on wedding day!


Tuesday, May 8, 2012

Save-a-Guest Kit

Due to my klutzy predisposition, I often find myself in need of a band-aid, safety pin, or Tide pen.  To "save" my guests from all manners of issues, I put together a "save-a-guest" kit for each of the bathrooms at my reception.

For the men's kit, I had:
  • Tide pen
  • Lint roller
  • Band-aids
  • Antacids
  • Ibuprofen
  • Floss
  • Safety pins
  • Breath mints
For the women's kit, I had all the above items, as well as:
  • Nail files
  • Bobby pins
  • Tampons
  • Pads/panty liners


It took me maybe ten minutes to assemble these, with a total cost of $20.  I got the medicines, lint roller, and baskets from Dollar Tree.  The band-aids, safety pins, and ladies products were from my house.  Cute nail files from the dollar spot at Target, mints and Tide pens from the grocery (with a coupon), and the floss I begged from my dentist!  Ta da!

And hey, if nobody uses these things, I can always keep them in my purse as a "save-a-Bonnie" kit.


Thursday, May 3, 2012

Cake Topper Pennants

Call them pennants or bunting, but those adorable triangles on strings are quite the hit this year!  We're having them all over our wedding, so naturally they need to be on our wedding cake, too!

My grandmother gifted us this sweet cake topper by Willow Tree.  I can't wait to see it on our cake AND in our home after the wedding!  Thus, requirement #1 is for the pennants to be tall enough not to interfere with the couple.


Many people use wood skewers (for grilling) as the poles for the pennants, but mine required more height so I used a super narrow wooden dowel I found at Lowe's for 50 cents.  I painted them silver to add some pizazz.

Next I made the strings for the pennants.  I twisted together embroidery floss in our wedding colors to make it extra cute.  String, yarn, or ribbon would also work quite nicely.


I then chose a number of papers from my scrapbooking stash that coordinate with the life-size pennants at our wedding.  I could have used the same fabrics, but the paper seemed easier.  I made a triangle template from a plastic folder so they'd all be the same.

I folded the paper to create the top edge of the triangles.  Then I traced the triangle using my template, and cut the non-folded sides.


Once I had a good collection of pennants, I arranged them on the strings.


Using one of my new favorite products, I applied adhesive and glued the two sides together, trapping the string in the fold at the top.


This super-cute project took about an hour and cost me 50 cents out of pocket (because I already had all the other stuff).  But if you absolutely had to buy everything from scratch, I would guess $10 at the most including adhesive, embroidery floss, and pretty papers.

I chose not to do this, but you could easily print or stick letters on your pennants to say "I Do", "Just Married", or even "Happy Birthday".  I can't wait to make more of these DIY cake topper pennants for other parties!  Happy crafting!


Tuesday, May 1, 2012

Flower Girl Baskets (with exchangable liners)


Pre-Easter, I was so certain that I would be able to walk into any store and find pretty white baskets that would be perfect for my flower girls.  That wasn't the case.  They were all too big, too small, too colorful, or the handles were too long.  Eventually I settled on the one you see above.

Obviously the Easter theme had to go, so I decided to replace the liners with ones that match my wedding.  The cool thing about these particular baskets is that replacing the liners is super simple (and cheap), so I can pass them along to friends or family for their weddings (I'm looking at you, future sister-in-law!).

My Mom disassembled the original basket liners, and laid them on top of the new fabric as a pattern.


She used their same sewing technique, where inside the basket the seams would be hidden, and they would also be hidden on the outside, once the excess was folded around the basket.  This means that not all the seams are on the "right" side of the fabric.  I know.  Confusing.

To make the edges cute and allow them to tie, she used coordinating grosgrain ribbon.


I used a the Clover Flower Frills size medium template and scraps from the flower girl dresses to make the cloth carnations.  It's SUPER easy, and a great use of scraps!  You simply fold the template around the fabric, snip the end, and thread it onto a string. 


Add 10-15 of these, then stitch them all together.  Fluff it up a little, and you've got a cute flower!


It took us about two hours to make five complete baskets.  We used fabric from the bolt we got for the flower girl dresses, and I used scraps from cutting out the dresses to make the flowers.  

I can't wait to see those cutie pie flower girls with their baskets!