Tuesday, July 23, 2013

Kitchen Update: Shelving

When we first bought our house, there were these funny little glass shelves in our kitchen.  Mostly they collected junk and dust, and because they were glass I was scared to put my cookbooks on them.  I also broke one during the home inspection.  Whoops!


These just don't say "pile books on me"

To make this area more functional, we decided to put in sturdier shelving.

We kept the adjustable sides and corresponding brackets, and simply cut pieces to length.  What we ended up using for the MDF was a closet shelf.  At $13 each, and no paint necessary, cutting a shelf seemed like a wonderful idea.

To keep the MDF from splintering, we wrapped the cut line in tape.  It helped some, but there was still some splintering.  No biggie though - with all my cookbooks loaded on you wouldn't be able to see the cut edges anyways!

Tommy loves helping on projects where he gets to use power tools!

We slipped the new shelves in and loaded them up!


Now the little space is much more functional, and I have my cookbooks within easy reach.


I was a little worried about the sunlight from the windows ruining the color on the covers, and then I decided not to care about it.  The insides are the best part anyways!


All in all, this project was $26 - just the cost of the two shelves we cut up.  Everything else we already had!  The five cuts were crazy easy.  Definitely a project I would do again!

Kitchen Storage Love!

You might also be interested in these posts:
Granola Bar Word Art
Kitchen Blinds
Painting the Kitchen
Binder Cookbook


Thursday, July 18, 2013

Hexie Eye Spy Quilt for Penelope

I just finished up another eye-spy quilt, this time for little Miss Penelope!  She was born in June, but I got a little behind, and then I decided to deliver it in person, so you're seeing it a little late.  Sorry!


This one came out sooo cute!  I found the fabric during my spring trip to the Los Angeles Fashion District, at this great shop called Michael Levine's.  I can't remember if they're all from the same line, but the birds are from the Hello Birds line by Riley Blake and came in several color ways, and also in flannel, which I chose for the back.  The stripes and dots were super adorable and matched perfectly.  I went with turquoise for the triangles to add another pop of color.


Every hexagon (quilters call them "hexies") is cut from a different fabric, and I chose this set especially for Penelope.  There's South Carolina where she was born, cats and dogs for her pets, her parents alma maters, etc. etc. 


Pretty soon, she can spend lots of tummy time on this quilt, but later she can snuggle in it, learn to count and match, and make up stories about the pictures.


I made one for her older sister two years ago, and actually had it when I finished this one because I was mending a small tear.  I love how they kind of coordinate!  Looking closer, they even have a few of the same images!


It was really special getting to make this quilt for Penelope.  While I was sewing, I kept thinking about her and her family, and sending them my best wishes!  Welcome Penelope, and Happy Birth Day!


Interested in making one of these yourself?  I offer a kit on my Etsy page that can get you started without having to buy and cut 100 different hexagons!


Monday, July 8, 2013

1st Anniversary + Cool Wedding Gift Idea

Tommy and I celebrated our first anniversary over the weekend!  My goodness, a year went by fast!  We had a great couple of days, much of them spent remembering how much fun our wedding was and how happy we are to be married to each other!

Friday night we kicked off our celebration with fancy champagne and year-old wedding cake (which was actually pretty tasty still!) on our deck.


Then we headed out to a swanky restaurant, which gave me a great excuse to wear my now-blue wedding reception dress!  The restaurant is just across the lake from our house, and our neighbors knew we were there, so they lit off a few leftover fireworks for us!  Sooo romantic!


Saturday we went for a bike ride, then to the Nationals game, where we saw our first dance song performed live by Thompson Square!  After the game we explored the new Yards Park near the Nats stadium in Navy Yard.  Wow, has that place changed!  If you're looking for something new and different to do in DC, I highly recommend taking a picnic over there. 

Sunday we did lots of house chores, but finished the weekend off with our very first grilled pizza (in the rain, whoops), and a very special bottle of wine.


Is this not the coolest wedding gift?!?  Our friends gifted us 12 bottles of Anniversary Wine, one each for years 1-10, another for year 15, and a another for year 20!  To top the cool factor, it was also incredibly delicious.  I can't wait to try it over the years as it matures.


We got out our Little Black Journal of Wineand refreshed ourselves on how to evaluate a wine.


Then we applied our new skills to our Anniversary wine, and made sure to take careful notes.  In the future, we can compare it as it matures!


Such a fun, local, special weekend with the love of my life!


Friday, June 28, 2013

Rainbow Sherbet Cocktails

My neighborhood had an ice cream social last week, so I wanted to share what I brought!


My Aunt Mary bought some rainbow sherbet vodka recently, but wasn't a fan, so she passed it on to me.  Serendipity struck, as this happened mere days before the ice cream social.  So of course I had to make a drink!

The vodka is super-sweet.  We tried mixing it with 7-Up, and it tasted like cotton candy.  Wayyy to sweet!  To cut down on all that sugar, I decided to mix it with sour/bitter fruit juices.

Rainbow Sherbet Cocktail:
  • 1 oz. Pinnacle Rainbow Sherbet Vodka
  • 2 oz. Orange Juice
  • 2 oz. Cranberry Juice
  • Lime for garnish

These were fruity and refreshing - perfect for a hot summer evening!


Tuesday, June 25, 2013

Extra Long (and cheap!) Curtain Rod

Weren't those curtains last week exactly what was needed to finish off the living room?


Did you stop to wonder how in the heck we managed to get a 20' curtain rod?

Ordering the curtains was easy.  The problems started when we tried to hang them.  That wall with the sliding doors is 20 feet wide, so not just any curtains rods would do.

First we tried two 10' rods.  The problem with regular curtain rods is that they require a center support.  If you use the center support, the curtains have to be on both sides of it, meaning that in our living room, we'd have a lot of curtain mass bunched between the doors in the center, which I didn't want at the time, even though we're doing it now.

We tried hanging them without the center support, but the rods were wimpy and sagged under the weight of the curtains panels.  FAIL.  So we returned them.  Did I mention they're like $150 for two?

Next we researched curtain tracks.  These are not only ugly, but they're also expensive ($300) and get poor reviews.  We thought it was our only option, so we ordered them.  In the end, it turns out I didn't ever click "order" (don't drink and shop online?), so they never came!  I was really excited about this instance of serendipity, because in the meantime I thought up an even better idea!

Back when my Mom had a women's clothing store, she used electrical conduit poles to hang stock in the warehouse.  I'm talking hundreds to thousands of pounds of clothing hung on each pole.  Turns out a 10' conduit pole is not only strong, but is also only $7!!!

The strength of the pole allowed me to have a 10' span of rod, uninterrupted by a support.  I bought two 10' conduit poles, 1" in diameter.

Now I just had to figure out how to attach it to the wall!

I bought every single thing sold at Home Depot that might possibly work (L brackets, shelf brackes, curtain rod brackets, wood pieces used for stairs, etc.), and brought it all home.  In the end, what worked best and looked best was a shelf bracket.

We attached it to the wall with super-duper triple-action drywall anchors.  We attached the conduit with conduit straps.  The center bracket acts as the support for both poles.

they didn't need to be exactly 10' each, so Tommy cut off a little with a hacksaw


Shopping List (they're not paying me, I just wanted to show you what we bought):


Let's play "where's Waldo?" with the bracket...
there it is!
pretty simple, just a shelf bracket, conduit strap, and conduit piping
We left conduit past the ends so we could use the curtains to cover the brackets

I'll admit that these are not the most-beautiful-ever-in-life curtain rods.  However, they cost less than $25, span 10 feet without a center brace, and with the pattern on the curtains, you don't really notice them anyways.

I'll take it!

If you're not crazy about the look of conduit, I used some hammered spray paint recently that would give these a beautiful finish.  I didn't bother for this project, but maybe in the future I'll decide to spruce them up.  Something to think about.  In other homes, I bet gold or wrought iron black would look amazing.

So for a few hours of labor (mostly trial and error to see what would work) and $25, we were finally able to hang up those curtains!  Sure beats the $150 ones that sagged or the $300 ones that were ugly and probably wouldn't even work all that well.

On future projects, even if I don't need a 10' span, I'll definitely be going with conduit.  The economics are just too good!

This project was really easy, and one I would definitely recommend!  Be sure to have a friend on hand - this was sooo much easier with two people.


Monday, June 24, 2013

Liquid Hand Soap

The DIY liquid hand soap I made a few years ago has been one of my most-visited posts.  I recently made it again, but changed up the recipe a little, so I'll share what I did differently!


What I loved about the first one was:
  • It made over a gallon of hand soap
  • It was free from hazardous crap like triclosan (in antibacterial soap; read more about it from the FDA, wikipedia, beyond pesticides, EPA, but essentially it can bioaccumulate, it's a hormone disruptor, and it isn't proven to be better than regular soap)
  • It was cheap
What I didn't love:
  • It kind of felt like snot
  • It didn't get sudsy enough for our tastes
  • My husband hated it

So I fixed all that!  This recipe still makes cheap, healthy handsoap, but doesn't feel like snot and gets plenty sudsy.  My husband had no idea it was homemade.

I picked up this yummy little soap at Homegoods for $3.  I simply went through them all and picked the one with the best scent that didn't have nasty chemicals in it.


Ingredients:
  • 1.5 c grated soap
  • 2 T vegetable glycerin
  • 8 c water
  • It's the ratio that's important here.  If you grate your soap and get 3 cups, just double everything!

Method:
  • Grate the bar soap using one of the finest grating on your cheese grater
  • Add all ingredients to a large kitchen pot (it's OK to use a good one - it's just soap!)
  • Heat and stir until the soap is dissolved (I like to use a whisk)
  • Let cool completely to room temperature, so you know for sure you're not ending up with a brick of soap sponge (like the first time I ever tried this)
  • Fill up your containers!


The only bummer about using more soap in the recipe is that now it doesn't make as much.  Still, 2/3 of a gallon of hand soap for $3 is pretty darn good!  It also made less than the first time because the bar of soap was a good bit smaller.

Some hints:
  • If it turns into a spongey mess once it cools, just heat it back up and add more water
  • If it's too liquidy, first make sure it actually cooled all the way, then add more soap, reheat, etc.
  • I got my Glycerin at Whole Foods, but my readers say it's also available in pharmacies.  I paid about $6, but haven't even used half of it yet.
  • Avoid using soap with "stuff" in it, like tea leaves or exfoliating beads - they clog up your soap dispensers.


Wednesday, June 19, 2013

Living Room Update: Curtains

These lovely curtains were the very first thing we changed when we bought our house.  Mauve, beige, plaid, and dog-pee-stained, no thank you!!!  We moved in and they moved out.


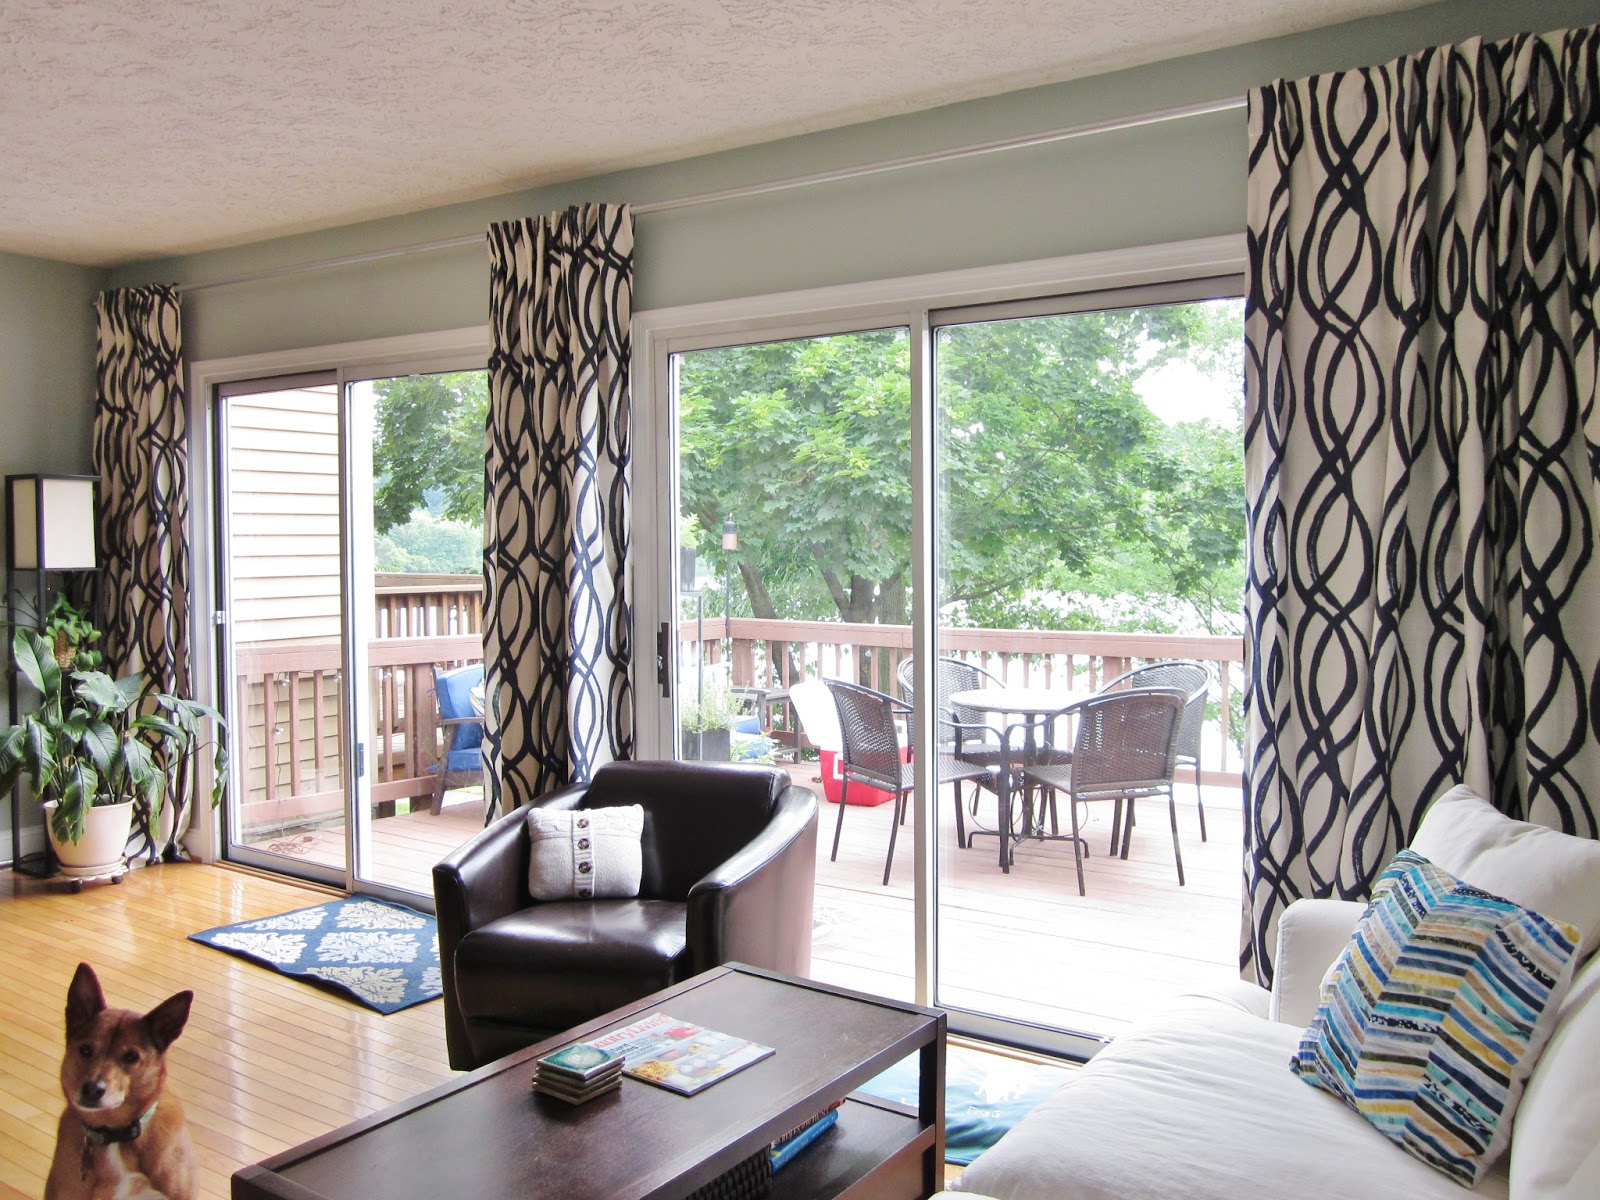
And then it took me six months to pick out new ones.  I considered making my own, but when I saw these Scribble Window Panels in midnight blue in the West Elm catalog, I couldn't turn them down!  At $35 a panel (after discounts), they were relatively affordable, so I ordered them!


Hanging them was quite the challenge (more on that soon).  Apparently a 20' span isn't a run-of-the-mill kind of curtain project.


They really make the room feel finished.  These curtains soften the room and simply make our home feel "us".  {sigh.}


I love how the waves mimic the motion in the lake out back.  I also love that they can block the view into our living room from the neighbor's deck!


They're a fun pattern, without being feminine.  They also tie in nicely with our beachy-without-actually-being-beachy living room theme.


They're a little overwhelming when totally closed, but we don't have them like that very often - only on super sunny afternoons so far.  


I haven't bothered to hem them yet, but I actually kind of like how they "break" on the floor.  I'm debating whether to sew the panels together.  If I don't we can choose to push them all the way to the sides or keep some in the middle.  But not sewn, they're more of a pain when you want to close them because you have to arrange each one just so.  I have bigger fish to fry right now, so they'll stay unsewn for a while longer.


Curtains really provide a lot of bang for the buck.  For a total project cost of $230, they gave a completely different feel to the room.  And a lot of privacy!  They also make a huge difference with solar radiation - if we close these when the sun is pouring in, it keeps the room a lot cooler.  So I'm smitten!


BTW, scroll back up to the first photo - I'm pretty excited over how far our home has come in the past year!