Wednesday, May 8, 2013

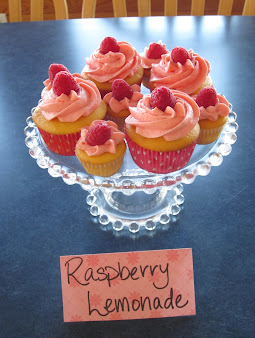
Raspberry Lemonade Cupcakes

Want to hear a good love story?  After losing his wife to cancer, a gentleman attended a wedding.  A friend made sure to sit him next to a fascinating woman, hoping her conversational skills would help him through the night.  Dinner and one dance later, he was smitten.  He proposed six weeks later, and they married a mere four months after that first night!

The fun part?  They met at my SIL's wedding, I know both the bride and groom, they're grandparents to teenagers, and their love has taken 10+ years off of them.  I have honestly never seen two people so in love!  I was touched to be invited to their wedding last weekend :)

My husband's family hosted a dinner for 50 the night before the wedding, and they asked me to do the desserts!  Over the next few days, I'll share what I made.


First up, raspberry lemonade cupcakes!


I know you won't believe it, but these were actually pretty darn easy.  I'm not a great baker, so I like to start with a box mix and get creative from there.  My scratch cakes tend to be disasters!

Ingredients:
  • 1 box lemon cake mix
  • Eggs (do what it says on the box)
  • Oil (do what it says on the box)
  • Water (do what it says on the box)
  • 1 T lemon extract
  • 1 c unsalted butter (2 sticks)
  • 3 c confectioners sugar
  • 2 T milk
  • 1 T raspberry extract
  • 4 drops red food coloring
  • 1 small box fresh raspberries
  • Icing bag
  • 1M star tip
Method:
  • Mix together the cake mix, eggs, oil, and water just like it says on the box.  
  • Add lemon extract and mix into batter
  • Fill cups and bake cupcakes exactly like it says on the box
  • Let them cool
  • Cream butter, milk, raspberry extract, and food coloring
  • Add confectioners sugar and whip until smooth
  • Add more sugar or milk if needed to get desired consistency
  • Using a large star tip on an icing bag, make swirls on top of cupcakes (I go from the outer edge to the center)
  • Top with a fresh raspberry
  • Serve on a pretty tray with a pretty label (it's all about the presentation!)

This recipe made about 12 regular and 24 mini cupcakes, and took about an hour of time in total (but I had to wash lots of dishes in between).


Aren't these beautiful?  The mini cupcakes were a huge hit!  Since I had three flavors of cupcakes, folks wanted to try them all, but not in full size.  That, and the frosting-to-cake ratio is much better on mini cupcakes.


Tuesday, May 7, 2013

Refinished Porch Light

Now that the yard is pretty and the front door is all spiffed up, the porch light is looking a little sad in comparison.

Nope, it's not dirty or faded, it's actually painted to look like this.


My first thought was to just replace it.  I collected up a number of pretty sconces on a pinterest board, but at $30 - $300, I wasn't chomping at the bit to just order one.

The current fixture happens to have this cool feature where it only comes on in the dark, so I can turn it on when I leave for work, and it'll welcome me home if I come home after dark 12 hours later, without wasting electricity all day.  Only the fancy models have this feature, so then we'd be in the $150 - $300 range.  Yikes.

I figured if we were going to replace it anyways, it might be OK to try refinishing it, with the potential of ruining it.

Tommy flipped the breaker and removed the fixture from the house.  I taped over all the electric parts, like the wires and the daylight sensor.

I bought this cool spray paint from the hardware store (Rustoleum Hammered Paint and Primer) - they do something fancy to it where it creates a hammered texture.  Not only does this forgive any dents or wear and tear on the item (that high gloss paint would highlight), but it looks pretty cool, too.  It was $8, so on the high end for spray paint, but cheap-o for a new light fixture.


I didn't have to, but I primed the fixture first.  (Before buying the spray paint - I didn't realize I wouldn't need it)


Then I sprayed three coats of the hammered finish spray paint, which ended up being the entire can.


I let it dry for a while, then discovered the underside needed a few extra spritzes.  I had to wait 48 hours from the first spray session, so this added days to the project.  (If you spray a second coat between 1 and 48 hours after the first coat, it can cause wrinkles in the paint)

It came out SO WELL!  The black makes the fixture contrast well with the brick on the house, and ties it in with the handrail.


Eight bucks for a brand new looking fixture sure beats $30 - $300!  Plus, the whole project took about 20 minutes of hands-on time.  Drying time added more hours, but that's OK with me.


Monday, May 6, 2013

Giveaway: Eye-Spy Quilt Kit {closed}

***This giveaway has closed.  The random number generator chose Michelle, who says her next project is making summer clothes for her kids!  Congratulations!  Thanks to everyone else who entered!***

I'm linking up with the Sew Mama Sew May giveaway!  After you enter for my giveaway, head over there to see hundreds more!


I have a number of pregnant friends at the moment, some due within the month!  My gift of choice for a new baby is an Eye-Spy Quilt.  Check back in the coming months to see the new ones!


Not only are these fun and cute, but they're interactive!  Newborns love to gaze at the bright shapes, but older babies can listen to stories about the pictures or learn counting, colors, and animals from all the different blocks!


I'm giving away an eye-spy quilt kit, valued at $55.

This kit includes templates, directions, and enough hexagons to make a crib size (36x54) eye spy baby quilt. You’ll get over 100 pre-cut hexagons from all unique fabrics - enough to piece the quilt, plus a few extras just in case. Fabric for borders and triangles is not included, but that’s where you get to personalize!


You can specify boy, girl, or gender neutral. You can also request fabrics like dogs, cats, sports, etc.

This kit allows you to make a beautiful, fun, and educational keepsake - without having to buy and cut 100 fabrics of your own! Families I've given these to use them for learning colors, counting, and animals, eye-spy, and telling stories. They also make a great surface to play on, and are machine washable. Use the included templates to add to your stash.

If you don't win, but would still like a kit, check out my Etsy shop.


To enter, leave a comment below telling me about your next project.  This isn't just a sewing blog, but a projects blog, so this could include anything from a recipe to home improvement to sewing a prom dress!  International entrants are welcome!  This contest closes st midnight ESTon Friday May 10, 2013.

Earn extra entries by following me on Pinterest or following my blog.  Head to my Pinterest page to follow, then leave a comment letting me know your username.  If you follow my blog, leave a comment letting me know what method you use to follow!

Thanks for visiting, and good luck!

If you're looking for more quilt inspiration, check out the one I made my husband from his worn-out work shirts!


A Blue Front Door

There's not too much background to this project, except that we wanted a blue front door!

Here's the difference from the previous rust color to the new blue.  Much more modern, bright, and fun!


The color is Loyal Blue, by Sherwin Williams.

We further enhanced the new door by replacing the kickplate with one in brushed nickel.


We also replaced the oil-rubbed bronze handleset with one in brushed nickel.  Out with brown tones, in with blue and silver!!!


There was nothing too special or challenging about painting the door or replacing the kickplate.

The handleset gave us the most trouble - the part that takes the key had to be very flat to the door, or the storm door wouldn't shut.  As it turns out, the model we had was the only one that would work, but it was $500!!!  I found the same one in brushed nickel on Ebay for $115, which was a huge savings.  We'll sell the old one on there, and maybe even come out even!

It's really started to feel like "us" around here!


You might also enjoy these posts:
Refinished Porch Light
Painted Porch Swing
A different spin on cafe lights
Refinishing patio furniture


Thursday, May 2, 2013

Caribbean Inspired Scrap Pillows

We took our honeymoon to the Caribbean in January...after months and months of cold dreary days winter days, we were blown away by the bold and beautiful sun-drenched colors of the Caribbean!

Savannah Bay, Virgin Gorda, BVI

I just had to bring some of that joy back home with us!

I've been aiming us towards a loosely-defined beach inspired living room.  Our initial inspiration for the room were some palm tree coasters Tommy picked up on his first trip to St. John, USVI.  We love that Tommy Bahama feel they have.  That said, I've been avoiding in-your-face beach stuff like shells and starfish pillows - they're a little much for suburban DC.  I also found some glass coasters at Anthropologie over Christmas and had to bring those home, too.

Over-the-top beach is too much, but beachy colors are OK, right?


I saw these pillows in the West Elm catalog the day after we got home - they were so whimsical and fun!  The colors weren't really doing it for me though.  Time to DIY my own knockoff scrappy pillows!


Lucky for me, I have a quilter Mom who has been making hundreds of sunset quilt kits (buy one here!).

that snorkeler is me!

The 12" blocks she sells leave scraps that are far too useful-looking to throw away.  I called her up and "ordered" an shipment of assorted scraps.  Thanks Mom!

I pressed and starched all the pieces to make them behave nice, then I cut 1/2" strips on the bias, at least 5" long.  I planned ahead to let the edges fray a little in the wash - cutting the fabric on the bias keeps the fraying from getting out of control.


I did this for all the fabrics she sent me, and ended up with a pretty fabulous collection!


Next I cut four 5" strips of muslin.  The goal is an 18" pillow, so 18"/4 = 4.5", but then you have to add 1/4" on each side for the seam allowance, which gets you up to 5".  I cut the muslin strips longer than necessary, since I was sewing the colorful strips on at an angle.

I laid down a variety of strips with controlled randomness.  At first it didn't look right, so I called Mom!  I was using too much red.  Narrowing the colors to blue, green, and yellow helped a lot.


Something else wasn't quite right.  Mom came to the rescue again to remind me that I had forgotten to leave white space.  Duh!

I tried just sewing the strips on, with no pins or guides, but that was a disaster.  They were crooked and messy, and it wasn't working.  I also tried using the same color thread for them all, and that look bad too.

Instead, I measured where each strip should start, then pinned the strips down.


I used five different colors of thread, matching as close to the various colors as possible - yellow, turquoise, sage, navy, and cerulean.  Much better!


Once the panels were done, I trimmed off the excess, lined up the stripes, and sewed the panels together.


Then I squared up my pillow front and cut it down to 18.5" square.  At this time, I also cut an 18.5" muslin square for the pillow back.

I sewed the front and back together, and installed an invisible zipper along one side.  This was a complete pain, and I wouldn't do it again!  Save yourself the trouble and just make a pocket for the pillow form!!!

I ran them through a vigorous wash cycle with a Shout Color Catcher (so those pretty blue dyes wouldn't ruin the muslin) to get the frayed look I was going for.  Bright color + fraying = Caribbean, right?

I inserted the pillow form (a higher-quality one I got on sale at JoAnn), and was done!  Oh yeah, except then I made two more...

This project took sooo loooong, but most of that time was spent cutting strips from 35 fabrics (I have lots of leftovers), getting the colors right, and installing those stupid zippers.  Live and learn.  Along the way, I also had a little accident with my rotary cutter.  Those buggers are sharp, so keep your fingers out of the way!  My pillows probably cost about $15 each, but took a bazillion hours.

In the end, it was all worth it. 


I'm not sure my pillows are much cheaper than West Elm's, but I adore them!  Even better, my husband hasn't stopped talking about them since I put them in the living room.  He says they're colorful and fun, yet soft.  Men are all about functionality - I'm glad he keeps me in line so our house isn't just pretty, it's comfortable, too.


And to top it off, the cheerful colors remind me of a happy honeymoon and keep the dreary weather away a little :)

I'm considering offering these in my Etsy shop!  Let me know in the comments if they're something you'd consider buying one day.  Do you get inspired by items in stores and make your own, but even better?