Showing posts with label baking. Show all posts

Friday, May 26, 2017

A Very Hungry Caterpillar Baby Shower

This past weekend I hosted a baby shower for my sister-in-law. It was themed after Eric Carle's book The Very Hungry Caterpillar.  I was very thankful to have my other sister-in-law and friends of the Mom-to-be helping me with this.  We divided up duties, and I got to do all the decor!  Thanks to Pinterest, I found several cute ideas I was able to copy.

This post may contain affiliate links.

We invited guests with these cute on-theme invitations.


I made this Hungry Caterpillar welcome banner using cardstock and my Silhouette Cameo to hang behind the chair where she would open gifts.  I even found a font similar to the one used in the book!  The red circles are 8" and the green circles are 6".


The paper lantern caterpillars are made using 10" red lanterns for the heads and 8" mismatched green lanterns for the bodies.  I found the most affordable lanterns at the Paper Lantern Store.  These sizes are fine for a smaller space, but I wish I had used larger ones for these large rooms.  I used command hooks (3 lb. strength) to attach the caterpillars the ceilings so I wouldn't have to poke holes with tacks.  The lanterns are strung onto fishing line.  I used cardstock and my Silhouette Cameo for the face pieces and feet!


I made the giant fruits by painting large swoops of paint onto posterboard (a glass of wine helped me be extra swoopy with my brush strokes, lol).  I used the paintbrush I normally use for painting trim and baseboards, and several colors of acrylic paint I had on hand.  After making all the swoops, I flipped the posterboard over and drew out the fruits, then cut them out.  I traced a roll of blue painters tape for the holes.  These were a great way to make large decor for a big room.


The diaper cake is made from about 60 Size 2 Earth's Best diapers (because they're plain white, the larger size helps make the cake larger, and I just really love this brand).  I used Goodnight Moon and The Runaway Bunny for the book layer, and clipped them together with paperclips.  I managed to find Hungry Caterpillar ribbon to wrap them up, and topped them off with a few Eric Carle toys!  I tried accessorizing the cake with mini versions of baby toiletries, but it looked too busy.


We asked the guests to sign a copy of The Very Hungry Caterpillar, as well as address an envelope for the Mom-to-be to use for her thank you notes.  With 45 guests worth of thank you notes to write, she needs all the help she can get!

We also asked guests to bring a book to build the baby's library!  I think he's going to be quite literate!  The quilt is made from an Eric Carle 10 Little Rubber Ducks panel.


A family member made this amazing caterpillar cupcake display!


My other sister-in-law developed a delicious menu: yogurt bar, croissant bar (she MADE them at the house which made the house smell so yummy) with egg salad and chicken salad, pinwheel sandwiches, mini muffins, Duck Donuts, and a popcorn bar.  She complemented the spread with a cocktail we named Peach Sparklers, which were made from peach puree, orange juice, and champagne.


Friends of the Mom-to-be created a draw-your-own bingo board where guests first filled out items they thought might get opened, then marked off squares as the gifts were unwrapped.  They also broke up the gift portion of the shower with two games, one with nursery rhymes and one with children's books.

I really couldn't be happier with how the shower came together!  It was cute, had great food, and fun activities.  But most of all, it brought together this amazing community of women who are super excited to welcome this sweet baby into the world.

Hopefully some of these ideas come in handy if you're planning a Very Hungry Caterpillar Baby Shower or Very Hungry Caterpillar Birthday!


Thursday, May 16, 2013

Hydrangea Cupcakes

Today it's time for cupcake #3!  (Cupcake #1 was Raspberry Lemonade and Cupcake #2 was Triple Chocolate)

These are essentially a vanilla cupcake with fancy frosting, but they were light, fluffy, and delicious!  I thought these would be the "wah-wah" of the three cupcakes, but many people told me they were their favorite!  I guess you don't have to have fancy flavors to be good :)


via

Ingredients:
  • 1 box white cake mix
  • Eggs (do what it says on the box)
  • Oil (do what it says on the box)
  • Water (do what it says on the box)
  • 1 c unsalted butter (2 sticks)
  • 3 c confectioners sugar
  • 2 T milk
  • 1 T vanilla extract
  • Blue and red food coloring
  • Icing bag
  • 2D tip

Method:
  • Mix together the cake mix, eggs, oil, and water just like it says on the box.  
  • Fill cups and bake cupcakes exactly like it says on the box
  • Let them cool
  • Cream butter, milk, and vanilla extract
  • Add confectioners sugar and whip until smooth
  • Add more sugar or milk if needed to get desired consistency
  • Divide the frosting, and make one purple and one blue
  • Attach a 2D tip to your icing bag
  • Glop some blue frosting in one side of the bag, and some purple frosting on the other side (it doesn't have to be perfect)
  • Put little glops of frosting all over the top of your cupcakes, not leaving any space between them (this doesn't have to be perfect, either!)  The blue and purple will blend nicely and make your cupcakes look like hydrangea blossoms!
  • Serve on a pretty tray with a pretty label (it's all about the presentation!)
 

This recipe made about 12 regular and 24 mini cupcakes, and took about an hour of time in total (but I had to wash lots of dishes in between).

Don't be scared of icing bags!  They really are quick and easy, and people think you have amazing talent!


Tuesday, May 14, 2013

Triple Chocolate Cupcakes

Today I'm back with cupcake #2!  (Cupcake #1 was Raspberry Lemonade)

These came out delicious, but not so rich they were overwhelming.

These were even easier than the raspberry lemonade cupcakes!  And just as delicious, but in a chocolatey way.  Again, I started with a cake mix - it saves time, and for me, they just come out better.


Ingredients:
  • 1 box devil's food cake mix
  • Eggs (do what it says on the box)
  • Oil (do what it says on the box)
  • Water (do what it says on the box)
  • 1 c unsalted butter (2 sticks)
  • 3 c confectioners sugar
  • 2 T milk
  • 2 T unsweetened cocoa powder
  • Chocolate garnish (I used chocolate curls)
  • Icing bag
  • 1M star tip

Method:
  • Mix together the cake mix, eggs, oil, and water just like it says on the box.  
  • Fill cups and bake cupcakes exactly like it says on the box
  • Let them cool
  • Cream butter and milk
  • Add confectioners sugar and cocoa powder and whip until smooth
  • Add more sugar or milk if needed to get desired consistency
  • Using a large star tip on an icing bag, make swirls on top of cupcakes (I go from the outer edge to the center)
  • Top with a chocolate garnish (it's all about the presentation!)

This recipe made about 12 regular and 24 mini cupcakes, and took about an hour of time in total (but I had to wash lots of dishes in between).


Wednesday, May 8, 2013

Raspberry Lemonade Cupcakes

Want to hear a good love story?  After losing his wife to cancer, a gentleman attended a wedding.  A friend made sure to sit him next to a fascinating woman, hoping her conversational skills would help him through the night.  Dinner and one dance later, he was smitten.  He proposed six weeks later, and they married a mere four months after that first night!

The fun part?  They met at my SIL's wedding, I know both the bride and groom, they're grandparents to teenagers, and their love has taken 10+ years off of them.  I have honestly never seen two people so in love!  I was touched to be invited to their wedding last weekend :)

My husband's family hosted a dinner for 50 the night before the wedding, and they asked me to do the desserts!  Over the next few days, I'll share what I made.


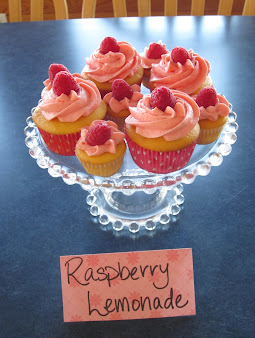
First up, raspberry lemonade cupcakes!


I know you won't believe it, but these were actually pretty darn easy.  I'm not a great baker, so I like to start with a box mix and get creative from there.  My scratch cakes tend to be disasters!

Ingredients:
  • 1 box lemon cake mix
  • Eggs (do what it says on the box)
  • Oil (do what it says on the box)
  • Water (do what it says on the box)
  • 1 T lemon extract
  • 1 c unsalted butter (2 sticks)
  • 3 c confectioners sugar
  • 2 T milk
  • 1 T raspberry extract
  • 4 drops red food coloring
  • 1 small box fresh raspberries
  • Icing bag
  • 1M star tip
Method:
  • Mix together the cake mix, eggs, oil, and water just like it says on the box.  
  • Add lemon extract and mix into batter
  • Fill cups and bake cupcakes exactly like it says on the box
  • Let them cool
  • Cream butter, milk, raspberry extract, and food coloring
  • Add confectioners sugar and whip until smooth
  • Add more sugar or milk if needed to get desired consistency
  • Using a large star tip on an icing bag, make swirls on top of cupcakes (I go from the outer edge to the center)
  • Top with a fresh raspberry
  • Serve on a pretty tray with a pretty label (it's all about the presentation!)

This recipe made about 12 regular and 24 mini cupcakes, and took about an hour of time in total (but I had to wash lots of dishes in between).


Aren't these beautiful?  The mini cupcakes were a huge hit!  Since I had three flavors of cupcakes, folks wanted to try them all, but not in full size.  That, and the frosting-to-cake ratio is much better on mini cupcakes.


Wednesday, March 6, 2013

Super Easy Mini King Cakes

It's a snow day here in DC!  I wanted to make a special breakfast since I had a little free time.  With five inches of snow on the ground, I needed to make do with what we had.

We celebrated my mother-in-law's birthday last night with a special-request homemade King Cake.  It was delicious, but unfortunately none of the leftovers came home with us!

Still craving King Cake, I decided to try my hand at making a breakfast version with stuff we already had.  It came out awesome, so I'm sharing it with you!

Ingredients:
  • 8-pack Pillsbury Crescent Rolls
  • 2 T melted butter
  • 5 T sugar
  • 1 t cinnamon
  • 1 c powdered sugar
  • 2 T water
  • 1/2 t vanilla

Method:
  • Preheat oven to 375 (350 for dark or nonstick pan)
  • Unroll the dough and separate into 8 triangles
  • Brush each triangle with melted butter
  • Combine sugar and cinnamon and scatter evenly over the triangles
  • Loosely roll triangles
  • Bake for 11-13 minutes or until golden brown
  • While rolls are cooling, combine water and vanilla
  • Slowly add liquid to powdered sugar, mixing with a whisk (don't add it all at once!); add just enough liquid to make a gooey mixture
  • Drizzle/spread glaze over the rolls
  • Top with colored sugars
  • Serve warm (or microwave) with a fresh cup of coffee!
  • Enjoy!

Start with crescent rolls

brush with melted butter

sprinkle with cinnamon sugar

bake at 350 for 11-13 minutes

glaze and top with colored sugars


serve warm with a fresh cup of coffee and enjoy!


Sunday, February 10, 2013

Mardi Gras King Cake

It's Mardi Gras season again!  We don't get the parades and parties here in DC, but I can bring Mardi Gras to my own house by making my annual King Cake.

This year's cake turned out the best of any I've made, and I'm grateful to have shared it with family and friends at a crock-pot-challenge party last night (my mother-in-law let me off the hook of making a crock pot dish, if and only if I made a King Cake).

Without further ado, here's the cake!


And here's the recipe!

Next year I plan to take orders for cakes, so if you're local feel free to place an order :)


Follow Me on Pinterest

Sunday, September 16, 2012

Dinner Crisis!

By the way, I'm still not sponsored by anyone, I just want to share! 

I don't normally talk a lot about our personal life when it's not involving projects, but I absolutely have to share this one!  I guess it's kind of like a project...

Somehow getting married made us lose the ability to plan and make dinner.  I don't know why or how, it just happened.  Maybe it was the longer commute, the huge list of home projects, or simply the pretty view from the back deck.  Or maybe it's just another symptom of the decision fatigue I've been experiencing since about three months before the wedding.

In any case, we got to the point where we would either eat out, eat pizza, or eat cereal for dinner.  This wasn't good for our health or our wallets!

A friend of mine blogged about losing baby weight, and said she'd been using something called emeals.  I googled them, and sure enough, it's a real thing.

eMeals - Easy Meals for Busy People!

It's like this: I pay about $5 a month.  In return, I get a week of dinner menus, all planned out.  Each one takes less than an hour to prepare (more like 20-45 minutes).  They handle the nutrition and calorie balancing, I just follow the directions.  They also give me a complete shopping list that should cost less than $100. 

So is this actually working for us?  YES!

I now put zero thought into what we're going to make for dinner, what I'm going to shop for, and how much it's all going to cost.  That means more time and money for enjoying married life, and more time and money for projects!!!  And honestly, our back deck beats any restaurant in the area.  I'm also not throwing away all kinds of food at the end of the week because I couldn't figure out how to use it.

One week I spent $80 on groceries.  The following week I used the extra meat I froze, and we were only in town three days, so my groceries were $10.62.  Last week they were about $60.  Compare that to even one night eating out, and we're so far ahead it's crazy!

We're doing the "Clean Eating for Two" program.  All the recipes make exactly two portions, and consist of fresh fruits and veggies, whole grains, and lean meats.  We're eating some staples, like rice, tomatoes, beef, and chicken, mixed with some items we had eaten only occasionally before like shrimp, jalapenos, and limes.  We're also trying some foods we've never had before, like orzo, kale, and lemongrass, and you know what?  They're yummy!

They also offer programs for singles and families, for people with kids, for vegetarians or other dietary restrictors, and even programs that follow weekly store sales so you save even more money.  I signed up for three months, just to try it, and also found a nice coupon through retailmenot.  {by the way, if you're not searching Retail Me Not for coupons every time you buy online, you're losing out on lots of great deals!}

Here are a few of our recent meals:
Chicken Parmesan with Tomato Argula Salad
Lemongrass and lime shrimp stir-fry
Balsamic Chicken and Greek Orzo

So anyways, that's my new exciting thing I'm up to.  Just wanted to share in case it rescues someone else from the dinner blues!


SAVE TIME AND MONEY WITH EMEALS MEAL PLANS


Follow Me on Pinterest

Thursday, May 3, 2012

Cake Topper Pennants

Call them pennants or bunting, but those adorable triangles on strings are quite the hit this year!  We're having them all over our wedding, so naturally they need to be on our wedding cake, too!

My grandmother gifted us this sweet cake topper by Willow Tree.  I can't wait to see it on our cake AND in our home after the wedding!  Thus, requirement #1 is for the pennants to be tall enough not to interfere with the couple.


Many people use wood skewers (for grilling) as the poles for the pennants, but mine required more height so I used a super narrow wooden dowel I found at Lowe's for 50 cents.  I painted them silver to add some pizazz.

Next I made the strings for the pennants.  I twisted together embroidery floss in our wedding colors to make it extra cute.  String, yarn, or ribbon would also work quite nicely.


I then chose a number of papers from my scrapbooking stash that coordinate with the life-size pennants at our wedding.  I could have used the same fabrics, but the paper seemed easier.  I made a triangle template from a plastic folder so they'd all be the same.

I folded the paper to create the top edge of the triangles.  Then I traced the triangle using my template, and cut the non-folded sides.


Once I had a good collection of pennants, I arranged them on the strings.


Using one of my new favorite products, I applied adhesive and glued the two sides together, trapping the string in the fold at the top.


This super-cute project took about an hour and cost me 50 cents out of pocket (because I already had all the other stuff).  But if you absolutely had to buy everything from scratch, I would guess $10 at the most including adhesive, embroidery floss, and pretty papers.

I chose not to do this, but you could easily print or stick letters on your pennants to say "I Do", "Just Married", or even "Happy Birthday".  I can't wait to make more of these DIY cake topper pennants for other parties!  Happy crafting!


Thursday, March 8, 2012

Lemon Cake

I volunteered to make my future-mother-in-law's birthday cake this year.   A little bird told me that she loves lemon, so I decided to make her a lemon cake!

Some light googling led me to this lemon cake recipe, and the comments made it sound easy and no-fail, so it was an easy choice.  I'd never made a cake from scratch though, so I was a little anxious how it would come out.

lemon cake ingredients

My kitchen aid mixer was awesome for this project, as many steps require mixing for several minutes.  I was also happy I had my handy dandy zester, which made zesting all those lemons much easier!


The cake came out a little dry, but that may have been due to forgetting the step of dousing the cake in lemon syrup right when it comes out of the oven.  I did this step the next morning, and the syrup didn't soak into the cake well.

However...the icing was AMAZING.  I really could have eaten the entire bowl of it.

lemon cake

In the end, the cake turned out pretty well, and my future-mother-in-law was happy!  Success!


PS: This cake is also delicious for breakfast!

Monday, February 6, 2012

Mardi Gras King Cake

It's that time again... King Cake Season!  Historically, King Cake season is the period between Epiphany and Mardi Gras (the day before Ash Wednesday).  It's the primary dessert of Mardi Gras.  There's a trinket hidden in the cake, usually a small plastic baby (for the Baby Jesus).  Whoever finds the baby in their piece is King for the day.  They also host the next Mardi Gras celebration.  As a kid growing up on the Gulf Coast, we had Mardi Gras parties at school every Friday.  Whoever got the baby was responsible for bringing the cake the following week.

King cakes come with a variety of fillings, but I prefer cream cheese, so that's what I'll write about today.  This can be easily left out altogether, or substituted with strawberry jam or anything else that sounds delicious.  King cakes taste a lot like a frosted cinnamon bun when it's all said and done.  While they make a great dessert option, I also enjoy them with a cup of Community Coffee for a traditional Louisiana Mardi Gras breakfast!

To begin, I like to get all my ingredients out.  Some of them, like plastic babies, colored sugars, and dry milk powder can be challenging to find, so I like to get everything a few days before I plan to bake.

This recipe makes two medium King Cakes (about 15 servings each).  Allot about four hours total time, with an hour of hands-on time dispersed throughout that four hours.


Bonnie’s Best-Ever
Mardi Gras King Cake
(with cream cheese filling)

Ingredients:

For the cake:
½ oz. instant yeast
1 ½ c warm water
½ c sugar
5 c flour
½ c dry milk powder
2 t salt
2 eggs, beaten
1 c melted butter

For the filling:
½ c melted butter
2 c sugar, divided
4 T cinnamon
16 oz. cream cheese, softened

For the topping:
2 lbs. powdered sugar
1 T almond (or vanilla) extract
¾ c water
Purple, green, and gold sugars


Making the dough:

1.      Combine yeast and warm water and set aside.


2.      Add all dry ingredients to a large mixing bowl.  Using the dough hook on your electric mixer, blend ingredients on low for 2-3 minutes.


3.      In a separate bowl, combine eggs, ¾ c butter, and yeast mixture.  Slowly add this to the flour mixture.


4.      Mix 8-10 minutes or until dough separates from the bowl.  An additional ½ c of flour may be added if the dough is too wet.


5.      Brush a large stainless bowl with melted butter until coated and place dough inside.  Brush dough with melted butter to keep moist.  Cover the bowl tightly with plastic wrap and let dough proof in a warm place for 1 hour or until doubled in size.


If my house isn't warm enough to make dough rise well, I'll put the oven on the lowest setting and let the dough rise in front of the open oven door.


Assembly:

1.      Preheat oven to 350°F.


2.      Take about half the dough and roll out onto a floured surface into a large rectangle (about 24” x 14”).  


3.      In a small bowl, combine ½ c sugar and 2 T cinnamon.


4.      Brush the dough with ¼ c melted butter, and sprinkle cinnamon sugar evenly on top.


5.      Mix 8 oz. cream cheese with ½ c sugar.  Apply this mixture, about 1” wide, to the dough rectangle, about 2 inches from the close side.


6.      Starting with the cream cheesed side, roll the dough into a long log.  Bring the ends together to form a circle (I like to weave the ends together to make a continuous circle), and place on a baking sheet.


7.      Repeat steps 2 – 6 for the second half of the dough.


8.      Let the dough rise for one hour or until doubled in size.


9.      Bake 20 – 25 minutes or until golden brown.


Note: When I don’t opt for the cream cheese filling, I like to braid the cake instead.  Cut the rectangle into three pieces, longways.  Fold each in half so the cinnamon sides are hidden.  Pinch the ends together on one side and braid the strands.  Make a circle once you’re done, weaving the ends together for a clean look.


Finishing touches:

1.      Allow the cake to cool completely.  Insert the baby into the cake.


2.      Combine sugar and salt.


3.      Mix on low speed while slowing adding the almond extract and water.


4.      Drizzle glaze over the first cake, and sprinkle with purple, green, and gold sugars.  Repeat with the second cake.


Tips and advice:

1.      Plastic babies can be found in the baby shower section of your local party store or on AmazonDon’t bake the baby into the cake.


2.      The cake aisles of party and craft stores offer the best colored sugars.


3.      Glaze one cake at a time so the glaze doesn’t set up while you’re still decorating.


4.      King cake makes a wonderful breakfast, especially with a cup of coffee.


5.      Try warming up a leftover slice of king cake for about 10 seconds in the microwave.


6.      It’s much easier to make two medium-sized king cakes with the recipe rather than one large one.  Then you can share it at two parties!  (Or keep one for yourself)