Tuesday, December 31, 2013

Removing textured ceilings


Our specific variety of textured ceiling has a few names: crows feet, stomp texture, slap brush, and panda paw.  Don't those all sound exciting and fun?  THEY'RE NOT!!!


We have ceilings like this all over our home.  The texture is so dimensional that we jokingly call them stalactites.


Mostly I hate them because they collect dust and create shadows on the ceiling.  See how dark the ceiling looks in that first photo?

Everyone we talked to said they're very hard to remove completely (they're applied differently than popcorn), and thus it's quite expensive to have it done.  We don't hate them enough to throw thousands of dollars into making them disappear, so we thought we'd try something cheaper first.

How about just sanding them a little?

Armed with lots of protective gear (glasses and mask are a must!), we just wrapped sand paper around a sanding block and went at it.  The stalactites broke off easily, and the smaller mountains sanded down without too much more elbow grease.


It took a little over an hour to do this 10' x 9' room in our house.  Cleanup was another half an hour, because this process creates a LOT of dust (be sure to open the windows, close the vents, and shut off the AC).  This project was super cheap - just the cost of a pack of sandpaper.

Here's a closeup of what it's like after sanding.  It's not totally smooth (that costs big bucks), but it's a huge improvement!


Here's the room half finished.  The left side has been sanded already.


Doesn't the ceiling look so much better?  Cleaner, brighter, more welcoming.  Such a difference!


Let's compare to the "before" again:


Now I have the itch to do the rest of the house...

Be careful, because it will make quite a mess!


Wednesday, December 25, 2013

Not all gifts come under the tree...

Guys, I have really big news to share!!!

We're having a baby!!!


Tommy and I are so excited to be welcoming our first child sometime towards the end of May.  That puts me at 18 weeks!  So far, everything is going great, and we hope to be able to announce the gender soon.

We have lots of fun projects planned to get our nursery all set up.  We've actually been working on a few already, under the guise of "guest room" projects (like crown molding).  Since the guest room is becoming the nursery, we're also working on renovating the basement to become a welcoming guest room, especially since I know a set of out-of-town parents who will be visiting quite often :)

I apologize for being a bit absent lately.  Between first-trimester sickness and lots of other crazy stuff, my projects have been taking a back seat to life.  But now I have my energy back, and we're gaining momentum getting our house back in order (new carpet upstairs, plus a leak in the basement that caused massive structural issues have been big setbacks), so expect to be hearing from me a lot more!

Tuesday, December 10, 2013

10 Christmas Gift Ideas, brought to you by VinoVinti

This post brought to you by VinoVinti. All opinions are 100% mine.


ATTENTION FAMILY!!!  DO NOT READ!!!


For everyone else...


Stumped on what to give for Christmas?  I thought I'd share a few fun ideas that I came up with for those hard-to-gift people in your life.

Do they enjoy going to events?  Tommy's been getting a lot of use out of his ticket frame, but this season I came up with an even easier way to do it!


Are they into cycling or off-the-beaten-path travel?  My Dad has gone nutso for cycling in the past few years.  I read a review about this book, and it sounds great!  A Dad and his 8-year-old bike across Japan for 62 days.  I hear it's also great for those with the travel bug.


Maybe they're into baking and cooking.  My Mom made her own pomegranate jelly this year, so I'm getting her these cute pomegranate dishtowels to remember the occasion.  I also loved the 12 Days of Christmas dish towels for stocking stuffers or hostess gifts.


Are they in love with Carrie Underwood, musicals, or the Sound of Music?  Because that describes basically half of my relatives.  The DVD and CD of the live-on-TV Sound of Music is on my shopping list several times over.


Did they get married this year?  These wedding invitation ornaments are such a quick and easy project, but come with huge satisfaction.  I've been making these for all our newlywed friends, and they're fun for couples to hang on the tree every Christmas to remember their wedding.


Are they crazy about a certain food?  How about a specialized cookbook.  This doughnut cookbook is perfect for my husband, who always talks about making his own but needs a little more info to get started.

Are they expecting?  Help the couple remember this special time with a cute parents-to-be Christmas ornament.


Need a co-worker gift?  My go-to is two bags of Peet's coffee with a fun mug.  This is always one of the most fought-over gifts in our secret santa exchange!


Do they like wine?  My family sure does!  We got a wine aerator for ourselves this year and really like it!  We've done several blind taste tests, and there's definitely a difference.  Buy one (or several!) for hostess gifts, stocking stuffers, or for that hard-to-shop-for aunt, brother, or Dad.

The VinoVinti is a little different because it uses a different method than the standard aerator - it pumps carbon dioxide out of the wine.  Opening a wine makes it taste less acidic and improves the experience of drinking wine - the mouthfeel, flavor, finish, etc.  We drink a few bottles of wine every week, and we like that products like this make an affordable wine taste much more expensive.


You can "like" VinoVinti on Facebook to find out more!


Hopefully now you've got some good ideas for Christmas!  Enjoy the holidays!


**Please drink responsibly, and as always, only drink if you are at least 21 years old or older**

Visit Sponsor's Site

Monday, December 9, 2013

Wine cork fire starters

This the gift was the quickest and most budget-friendly yet!


Every time we drink a bottle of wine, I toss the wine cork into a bowl, promising Tommy that one day I'll find something to do with them.  Now I finally did!  My grandmother was doing this at Thanksgiving, not sure where she got the idea from, sorry!


All you do is stuff a container with wine corks (I used a mason jar for added cuteness), and top it off with rubbing alcohol.  My one-quart mason jar, stuffed with corks, used about 16 oz. of alcohol.

To make it pretty, I tied a ribbon and label to the top of the jar.

aren't the corks pretty in there?

I gifted this to my in-laws, who have a wood-burning fireplace.  All they have to do is light one or two below their fire, and it should start right up!

It took me about five minutes to make this, and most of that was getting the bow pretty enough to photograph.  The only thing I bought was the alcohol for $2, and I only used half of it.  Cute gift for $1 and five minutes of time?  Awesome!!!  And the in-laws liked it, too!

**Be sure to practice fire safety and keep this away from the fire!


You might also be interested in these posts:

Ticket stub collection frame
Lanterns filled with ornaments
Upcycled sweater pillow


Thursday, December 5, 2013

Christmas Craft: Scottie Dog from a charm pack


This craft was one of the I-must-have-that things I got at the Houston Quilt Festival.  He's made from two Moda Aspen Frost Mini Charm Packs.

When I bought the charm packs, the instructions came free.

I layed out my squares so the colors and patterns looked nice and random.


Then I sewed them into strips (turns out vertical strips work better than horizontal), and sewed the strips together.


Whoops!  Redo!


I attached the two sides with a strip of red fabric.  The fabric got all wonky the first time and I had to take it apart and redo it.  Lots of pins helped the second time around.

I finished his look with a velvet ribbon and a button eye!


Isn't he cute on our sofa?


You might also be interested in these posts:

Holiday Card Holder
Christmas Cocktails
No-sew Glitter Tutu


Tuesday, December 3, 2013

Gift Idea: Easy Ticket Stub Frame

Last year I made a ticket stub frame for my husband out of an IKEA frame.  This year, I found an even easier way to do it!


Michael's sells a 12"x12" top-loading shadow box (they market it for collecting wine corks).  It's also perfect for tickets, and comes pre-made with a slot at the top!  Being 12"x12", a piece of scrapbook paper perfectly fills the background.  And it was 40% off, so of course I bought it.


I got a piece of black and white scrapbook paper, as well as another piece of a polka dot crimson paper with a velvety texture.

I ran the crimson paper through my Silhouette to cut out the logo.  I'm not an Alabama fan, but I sure do know a few!!! 

Then all I had to do was place the letter on the black and white paper, and load it all into the shadow box.


This project cost $22 ($20 for the shadowbox and $2 for the pretty paper), and took less than half an hour.  Most of that time was designing and sizing the "A" in the Silhouette software.


You might also be interested in these posts:

Frame a Ticket Stub Collection IKEA Hack
Holiday Monogram Wreath


Tuesday, November 19, 2013

Vintage Romantic Bouquets and Boutonnieres

My aunt's son is getting married the weekend after Christmas!  She's really excited to be gaining a lovely daughter-in-law, and is helping the couple plan their quickly-approaching nuptials!

The weekend after Christmas is a tough time to find a florist, especially a budget-friendly one.  It's also not practical for them to DIY the flowers, so I'm stepping in to make silk ones!

The bride chose this dress from NY&Co. for her bridesmaids (it's not on their site anymore, my apologies on no link), and I just love it.  Cute, pretty, flattering, affordable, and you can definitely wear it again.  She's pairing it with an ombre bubble necklace.


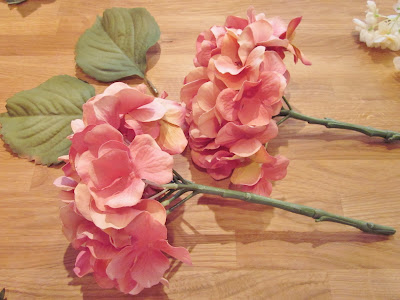
My aunt and I had a date at Michael's over the weekend to look at all their flower options.  We ended up going with dusty pink and cream hydrangeas for the bouquets, and a dusty pink rose for the boutonnieres.  I'm using ivory satin ribbon and lace leftover from the Christmas wedding I did last year to finish off the stems.


These came together really easily.

I started by cutting them stem of the pink hydrangeas into thirds.  I bundled two hydrangeas and all the stems together (this helps the handles be a nice thickness), and secured everything with floral tape.


I disassembled the ivory hydrangea into tufts of flowers.  I poked six tufts into the pink hydrangeas, and attached them with a glop of hot glue.


Then I hot glued the leaves from the pink hydrangeas to the bouquet, just below the flowers.

I finished off the bouquet with a wrap of ivory satin ribbon.

For the boutonnieres, I cut the stem of a silk rose to an appropriate length.  I hot glued a silk ivy leaf to the back of the flower, then attached a pin back to the leaf.  This way, the groomsmen can avoid the dreaded corsage pin!  I finished it off with a wrap of ivory satin ribbon.

I did the same steps for the corsages, but also included a sprig of the ivory hydrangeas to make them more feminine.

While taking photos of my creations, I realized the edges of the rose were fraying a bit.  I melted them back into submission by holding a flame near the edge.  The heat melts the polyester just enough to seal up those frayed edges, encouraging the flower to look less artificial.  I may or may not have caught the boutonniere on fire for a second...but no harm no foul.  I'll be more careful next time!


The interesting thing about these particular bouquets and boutonnieres is that it actually would have been cheaper to make them using real flowers.  The bouquets came in around $25 each, and the boutonnieres about $8 each, which is maybe twice what they might cost if I had made them with real flowers (this is because roses and hydrangeas are quite affordable).  That said, the family didn't have the resources to DIY the bouquets themselves, so silk flowers it was!  (Plus we got a few discounts through coupons and whatnot, so they came in under those estimates, all said and done)  Regardless, the flowers for the whole wedding will come in under $200, which is still a bargain compared to a florist!


You might also be interested in the following posts:
Elegant white bouquets and boutonnieres
Budget friendly bouquets and boutonnieres
Blue and white wedding flowers


Wednesday, October 30, 2013

One last reason why I hate wallpaper

Oh wallpaper, how I loathe thee.

First, you're hideous
Then, you firmly stick to the wall, coming off only in minute pieces of confetti
Next you must be scrubbed to remove traces of glue
And finally, your glue is never really gone, so you must be covered in oil-based primer


I talked to a handful of experts, and it turns out that even though I scrubbed the heck out of the walls to get all the wallpaper glue off, it's still a good idea to prime before you paint.

Wallpaper glue can become reactivated by water-based paints like the usual latex you'd use on walls, and cause bubbling and peeling and all sorts of mess I don't want to deal with.

Priming the walls with an oil-based primer seals in the glue and saves the day.  But nobody warns you that it smells horrible.


I bought the "odorless" oil-based primer Sherwin Williams offers, and went to town.  Coverage was OK, I suppose, but the smell was AWFUL!!!  Odorless, my foot!  We aired out the room for days and it still lingers.  Bleh.  Hopefully the normal latex wall paint will seal in the odor?


Anyways, now it's done and ready for pretty, zero-VOC paint.  Thankfully it'll be a while before we're hosting guests in here, so it'll have plenty of time to air out.