Monday, September 30, 2013

How to Shorten a Flat-Weave Rug {Easy Tutorial}

We got this super-cute navy and white striped rug for our dining room.  I love the style and that I can take it outside and hose it down if something spills on it (it's indoor/outdoor).

But.  It was too long.  It was overtaking the main walkway in our house.  The width was perfect, so I didn't want a smaller rug.  I just needed to shorten it!


This was SO EASY!!!

Tommy helped me set up the rug so all the other sides were in the right place.  We eyeballed where the edge of the rug should be (i.e., out of the walkway), and I marked it with a few safety pins.

With a striped rug this was super simple, but with a not-stripy rug I would measure before cutting.

First I cut off just a little so I could know how bad it might fray (bad), and tested out my method (good).


Then I cut off enough so that I had two inches on the rug past where I had pinned it.  This extra length gets folded over twice (to prevent fraying) and sewn down.


That's what I did.  I folded over the end twice, and sewed through all the layers.  My thread matched perfectly, so it didn't matter if I had ugly-looking stitches.  I made sure to keep the roll-over in place with a few clamps.  You know how when you roll up a towel, it gets wonky by the end?  The clamps were to prevent that.


You can see that my stitches aren't perfect, but since the thread matched so well (on the front side), you can't tell!


It took about an hour to hand sew the whole length, but you could do this with the most basic of sewing skills.  Plus, it was free!  All I used was a few yards of thread, which I already had.  I definitely recommend perfectly-matched thread, but the clamps could be substituted with binder clips.   I could also envision using this method to transform a large rug into multiple runners.  I'm already dreaming up what to do with the scrap!

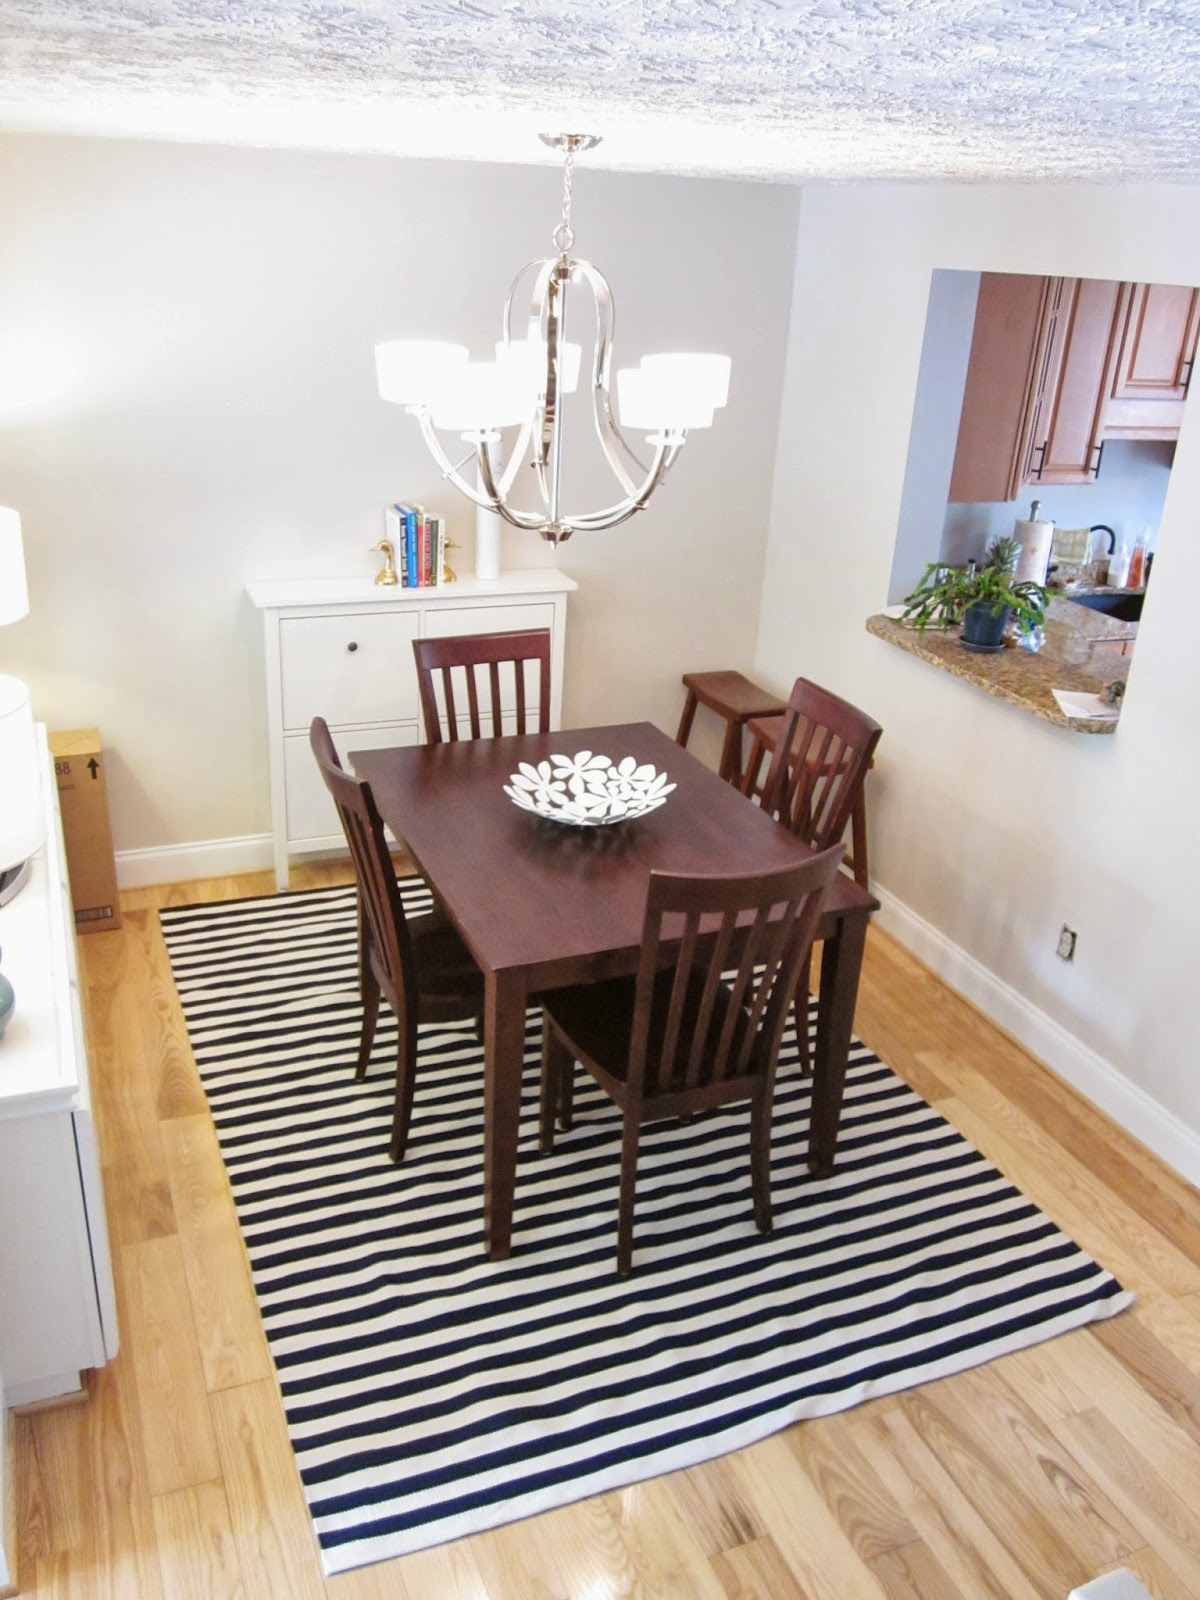
And...ta da!  Custom-sized rug for the dining room.

Much better than before! 


You might also be interested in these posts:

Painting the dining room
Painting the built-ins
An IKEA Hemnes shoe cabinet in the dining room


Tuesday, September 24, 2013

Small Space Solution: IKEA Hemnes as a Buffet

It looks like we finally have some easily-accessible storage in our little dining room!


Remember all that junk that was constantly taking over our dining space?  No more!


This handy guy is less than 9" deep, and because it doesn't have back legs, fits snugly against the wall.  The slim design allowed us to have something like a buffet in our dining room.

Except, it's not a buffet.  It's an IKEA Hemnes that's actually made to hold shoes!  Rather than drawers, the compartments tilt out for access.  My computer and accessories nicely fit in one compartment.  We have magazines in another, and there are still two empty that we can use for whatever may come.


At $100, I'm really happy with this new addition to the dining room!  It's cute, sturdy, slim, and holds all the stuff.  Perfect!

I have to be honest though, this thing was a complete pain to build and install.


Tommy has a LOT of experience building IKEA stuff (his 10-person office is all IKEA), but it took him a several days to build this thing.

Then, when we went to install it, the back didn't quite clear the molding.  What do you do when your IKEA Hemnes is too short for the molding?  Add length to the legs!

I bought 6 different options at the hardware store (everything from wooden buttons to drawer pulls), and plain wooden drawer pulls ended up winning.  I spray painted them with plain ol' primer, and affixed them with wood glue.  If this piece were going to move around much, I would have used something stronger, but since it's screwed into the wall and the knobs will only have vertical force on them, I think the wood glue will do just fine.


There's more staging to be done, but I'm pretty excited about the ducks!  We have lots of wildlife on the lake behind our house, but the ducks are our favorites.  Now we get to have them inside, too!


You might also be interested in these posts:

Painting the Dining Room
Hiring a Decorator


Thursday, September 19, 2013

Room for Color

Hi y'all, I have fun news!


I submitted our living room in Apartment Therapy's Room For Color Competition, and it was accepted!  While I may not win, at least I know my hard work can hang with some other really pretty places :)

Want to help me out?  Please go vote!  I can win some pretty cool stuff!  And notoriety, which is better anyways.

Thanks!

Monday, September 16, 2013

Dining Room Update: Painting the Built-ins


We're still loving the new color in the dining room.  A light, warm neutral was just what the space needed!  That said, the fresh new paint and white trim look so great that they make the built-in cabinets look dated and dingy.


We'd been thinking about painting the cabinets white, and the new wall color pushed us to finally go ahead and do it.

I started by removing the hardware and scrubbing everything to get it clean.  Then I sanded the trim and cabinets to create a rough surface for the paint to stick to.  Next I filled in any holes and divots with wood putty then did a final sanding.  For the final prep, I wiped everything down with a damp cloth.

I taped off things that didn't need paint - namely, the quarter-round that matches the floor, the grout and tiles, and the inside of the cabinets.


There was a little space between the top and the cabinets, so I filled it with paintable caulk.  Thanks to my husband for grabbing the camera!


Then I got to painting!

First Coat

Second Coat
First Coat

Second Coat

It took four coats to get decent coverage!!!  Thankfully the piece is small, so it didn't take all that long.

Meanwhile I got to work on the doors.  I started with the backs, which just like the cabinets took four coats of paint to get good coverage.

Before

Working on the first coat

Coat #1 done!

Coat #2 done!
After the backs had fully cured, I flipped them over and painted the fronts.  I did five coats of paint on the cabinet fronts, and I'm still not sure I'm happy with the results.

I gave them a full day to dry, but figured they could fully cure while hanging (which also gets them off my floor), so I went ahead and hung them back up!


The fresh bright paint makes such a difference!  The cabinets look much more modern, and the white paint helps you fully appreciate all that fancy beveling on the doors. {Thanks old owners, for choosing high-end cabinets!}


You're supposed to be looking at the tile, but aren't my "thanks for painting for a week straight" flowers from my husband pretty???

Jury's still out on whether the tile will stay, but for now I'm ready to forge ahead and finish decorating this room!  What do you think?  Should the tile stay or go?


You might also be interested in these posts:

Redecorating the Dining Room
Painting the Dining Room


Tuesday, September 10, 2013

My Sewing Machine

Happy Sewing Machine Day!

In honor of this bizarre "holiday", I thought I'd tell you a bit about mine...


It starts with my Mom.  When she was a 22 year old newlywed, she scraped together all her savings and bought a fancy-pants sewing machine - a Bernina 930.  I'm pretty sure it was the most expensive thing they owned, including their VW Beetle.  With this machine, she started her first business sewing wedding and bridesmaid dresses for the public.


Four years later, I came along!  I know that those many hours listening to the whir of her machine in utero and as a small child are exactly why I find the sound of a sewing machine so peaceful.


I learned to sew on this machine.  She started her second business on the machine, designing clothing for her own store.  It's also the same machine that made countless Easter dresses, prom dresses, high school theater costumes, quilts, and eventually my wedding dress!


So when I went off to college, I obviously had to have a machine of my own.  I wanted something good quality and that I was comfortable with.  So I did what all normal college freshman do and order a 20 year old sewing machine off Ebay and have it delivered to my dorm!  (Actually it was delivered to the Student Union, and I had to push/drag it half a mile to my dorm)

Yep, I bought an identical machine to my Mom!  The funny thing was that over 20 years, they hadn't depreciated hardly at all!  (And 11 years more past that, they're still selling for the same price)

The pros were this:  I already knew how to use it, it's well known to be a "workhorse of a machine" (especially after lasting through daily use by a seamstress), and my Mom could talk me through fixing it.  It's all mechanical, so no computers or electric bits to wear out.

Cons are as follows: It doesn't do all those nifty computer things that modern machines can, and it weighs 50 lbs. (oof)

So what's the verdict?  I love it!  I love how it sews, how it sounds, and how my Mom can talk me through cleaning and repairing it.  If you want a "forever machine", this one fits the bill!

she sits on a fold-away stand that I spray painted to match my craft room

My favorite "Bonnie Pink" sewing supplies are within easy reach


PS: Apparently Bernina also make a mini-me version called a Bernette that's cheaper and lighter, but is still a workhorse.

Monday, September 9, 2013

Dining Room Update: Painted Walls + Trim

Jeez louise!  Having a day job really gets in the way of completing a project in a reasonable amount of time!  Over the past week, I've stolen a few hours every evening to get the walls and trim in our dining room painted.

Before: Gold Walls!

We decided to paint the dining room Kestrel White - a warm neutral that the designers would probably call "greige".


I spent one whole evening just doing prep!  Wash the walls, spackle, sand, more spackle, more sanding, more cleaning!  Then the same thing with the trim, but add taping off the floor to the list.  I swear the prep work took longer than the painting.

However, I did finally prove to myself that taping off works a heck of a lot better if you remove the tape while the final coat is still wet.  It didn't mess up my paint job one bit!  In the past, I've experienced peeling at the edges which was completely exasperating.

So after all that prep, I did two coats of paint on the walls.  One coat probably would have been fine, but because the paint changed color so drastically between being wet and dry, I couldn't tell if I had the desired coverage or not.  Even with two coats, I only used half a gallon of paint.

I did three coats on the trim - the third mostly for good luck, as it probably wasn't necessary.  I think there's less than 20 feet of trim in the dining room, so that third coat really only took about ten minutes.


Changing the trim to white really makes the new color pop

When it first went up, I really wasn't too sure about the color.  I think it was such a change from the gold that it seemed super bland.  But after living with it for several days, we're loving it.  It is really bland, but I think that's a good thing in a space that opens into so many other rooms.  There's a lot of visual stuff going on just outside this room, so allowing the walls to kind of disappear is nice.  It's a warmer color than the Rainwashed or March Wind in the living room and kitchen, but it brings them together nicely.

After: Brighter and Less Bold
Much better than before!

As is typical around here, one upgrade makes other things ugly by comparison, and the built-in cabinets are no exception.  With the gold gone and the trim changed to white, this thing has become quite the eyesore.  The wood doesn't match the floor, and the cream trim looks dirty with all that fresh white nearby.  Next on my list is getting this beast painted!


You might also be interested in these posts:
Choosing Dining Room Paint
Dining Room Mood Board
Choosing Paint Colors