Monday, December 3, 2012

Living Room Update: Paint

Remember a million years ago when I chose a color for our living room?  I actually painted the living room that day, too.  I've been waiting to share it, though, because the living room has kind of looked like a wreck since then.

I left for Thanksgiving a few days before the hubs.  While I was gone, he cleaned the entire house.  I love that man!!!  It looks fabulous, so now it's time to share!

Let's start with some good "before" shots.  The walls were three shades of sponge-painted beige.  There were damaged spots from the previous owner's art, where we removed the curtains, and from the house settling.

Living room, the day we closed
Living room, post-curtains, post-move in


First things first, I chose the color.


Then I went up to Sherwin Williams and picked out the type of paint I wanted.  They have this amazing new paint called Emerald by Sherwin Williams.  It's zero-VOC, washable, durable, and self-priming.  Not only does zero VOCs mean it doesn't smell while you're painting, it also means your walls aren't off-gassing carcinogens for the next ten years.  The self-priming aspect was awesome, since I was painting over a medium-tone sponge paint.  Can we skip ahead so I can tell you my favorite part?  It only took one coat of paint.  I'm 100% serious.  Never in my entire life has that happened.


No, they're not sponsoring me to write that...yet.  I'm working on a deal with them to sponsor my next painting project!  I've never been so excited about a home improvement product.

While at the store, I also stocked up on a giant drop cloth (which I cut into smaller cloths at home), a new angled brush for edges, and some nice rollers.

Once I was home, I started by moving all the furniture to the middle of the room and covering it with drop cloths.


Then I started filling in nail holes.  I also put joint compound on some areas of the walls that were cracked or uneven.  Once the compound was dry, I sanded the areas smooth.  I used this cool compound that goes on fuchsia but dries white, so you can tell when it's ready.  Better life through chemistry.  I wiped down the walls with a damp paper towel, and vacuumed up any remaining dust.


Then I got to the painting!  I rolled some, edged some, and rolled some more. Initially, the color looked really light, but it dried darker and greyer.


Somehow I managed to forget to take a single picture of everything in the middle of rolling.

It went quick!  Between the one-coat wonder paint and all those doorways, it only took me 6 hours from when I left for the store to when I finished putting away dropcloths.  It cost about $40 for the amount of paint I used.  While this is one of the more expensive paints out there, I decided it was completely worth it.  Time is money!  And Sherwin Williams offers lots of coupons.

Here's the after!  We love how fresh and clean it feels.


And for fun, some before and afters side by side


We still need have a decent to-do list for this room, including:

  • Wider trim around the sliding doors
  • Paint all trim white
  • Curtains
  • Art
  • Sectional sofa
  • Hang the TV
  • Large area rug?
  • Upgraded lamps

Thursday, November 29, 2012

Holiday Sangria

We're hosting Christmas this year!  I'm super excited to entertain my parents and in-laws for such a special holiday!

I'll be testing out some recipes over the next few weeks and sharing them here with you.

First up is my Holiday Sangria.  I researched various sangria recipes, and used inspiration from them to create my own recipe.  It's sweet, tart, spiced, and smells like Christmas.  Try it at your next party!


Bonnie's Holiday Sangria

Ingredients:
  • 1 pomegranate, seeded (see my hint below)
  • 6 ounces fresh cranberries
  • 1 pear, cut into small pieces
  • 1 small green apple, cut into small pieces
  • 1 bottle red wine (I prefer Cabernet or Red Zinfandel)
  • 3 cups ginger ale
  • 1/2 teaspoon cinnamon
  • Dash allspice

Method:
  • Remove and keep the seeds of the pomegranate.  Make it easy by removing the seeds while holding the fruit under water in a large bowl.  The seeds sink, the white stuff floats, and the seeds that pop won't spray all over you.
  • Cut pear and apple into small pieces.  Don't peel them - the green peels look pretty in the finished product
  • Put all the fruit in a large pitcher
  • Add spices
  • Add wine, and stir to mix. Make sure fruit is covered by the wine to prevent browning.  At this point, you can cover and refrigerate and wait to finish the sangria closer to the start of your party.
Holiday Sangria
  • Close to serving time, add the ginger ale
  • Stir well and serve in clear glasses.  Spoon fruit into the glasses if it's not pouring well.
  • Enjoy!

Looking for more great holiday drinks?  Check out these Christmas Cocktails!

Washington Apple shots and martinis

Grasshopper shots and martinis


Follow Me on Pinterest

Tuesday, November 27, 2012

Lantern and ornaments centerpiece

Remember all those lanterns I used as our wedding centerpieces?

Lantern, chrome coral, and shell navy blue and coral wedding table setting

Here's where we get to reuse* them!  {Sorry, but I didn't have a photo of both types of lanterns}

This project was ridiculously easy.  I bought two 8-packs of ornaments from Michael's and put them in a lantern.

Ta da!

Lantern filled with ornaments Christmas centerpiece

By the way, I’m sharing this at the Dare to DIY party hosted by Decor and the Dog, Maybe Matilda, Newly Woodwards, and Two Twenty One!


*I didn't like the idea of throwing tons of stuff away, so I planned most of our wedding decor to be reuseable.  I'm looking forward to many future projects with our wedding leftovers!


Follow Me on Pinterest

Monday, November 26, 2012

Glitzy Holiday Monogram Wreath

Inspired by a photo on Pinterest, my first holiday project this year is a glitzy, sparkly monogram for my new last name!


This project was inexpensive and super easy!  It's also a fun project to do with kids as young as 6.  Here's how I did it.

Materials:

  • A letter cut-out.  These are available at the craft store.  I didn't like the size or shape of the available "M's," so I cut my own out of a piece of leftover plywood using a jigsaw.
  • Craft paint in silver or gold
  • Balls.  I took apart four floral stems with glittery berries on them, as well as a strand of beaded garland.  You can also use Mardi Gras beads.
  • Craft glue
  • Ribbon


What to do:

  • If you're making your own letter, draw the shape on a piece of wood.  Cut out using a jigsaw, and lightly sand the edges.
  • Attach hangers to the back of the letter if desired.  Do this before attaching the balls - if you do it after, you risk crushing the beads.  I used a fencing staple as my hanger. {yes, I did do this project at our family farm!}

  • Paint the letter with silver or gold craft paint.  This way you don't see wood through the spaces between the beads.
  • While that's drying, remove the berries from the steps and cut the beads apart.  I put mine in a large frisbee and mixed them up so they'd be random.
  • Start gluing the balls to the letter using craft glue.  I made sure to mix up big and small, silver and gold, to create a look of controlled randomness.  I made sure to use lots of the Mardi Gras type beads because I had more of them and they're cheaper.  I couldn't completely cut the strings off of them, but once they were glued down, you could hardly see them, and with so much going on they're not noticeable.


  • Don't do one whole side at once.  I did each corner before filling in between them so that if I ran out of one kind of ball it wouldn't be obvious.  It turns out I had exactly the perfect number of balls, a none of the ones from the stems were leftover.


  •  Let the glue dry completely.

  •  Add a pretty bow and hang!


This project took 2-3 hours to complete (it's hard to be exact on the time, because my cousins got interested in it and wanted help making their own).  It cost about $15, which includes the floral stems, beads, ribbon, paint, and glue, but not the wood (thank you Michael's half-price Christmas sale!).

If you have Mardi Gras beads, wood, glue, and paint on hand, you could do it for free, like we did for the kids!


I’m sharing this at the Dare to DIY party hosted by Decor and the Dog, Maybe Matilda, Newly Woodwards, and Two Twenty One!

Tuesday, November 20, 2012

Master Bedroom Update

When we combined households after our wedding, our bedroom was a mash-up.  His bed, my comforter, and we each had our own bedside tables and lamps.  It wasn't pretty.  This was going to be a "scary space" posting in October, but I had such a hard time finding all the goods that it just didn't happen.

{soooo, "before" photos were supposed to go here, but I lost them!  Here's what the photo would have been: faded World Market suzani print quilt, orange coral lamp, dusty black lamp, with the dog sleeping in the middle of the bed}

"before" mood board...a little too much "Bonnie" for a shared bedroom

We put our wedding gifts (and giftcards) to good use, and added white sheets and a puffy duvet with a white cover.  It immediately added sophistication to the space.  Although you can't see it, we also added our awesome new non-slip mattress pad.  Everything together made for a serious upgrade in comfort!  So much so that we now call our bed "the cloud".  {Thank you for the gifts!!!}


We trained Lucky dog to quit sleeping in our bed, which adds to both comfort and cleanliness (though I do miss the snuggling).  Nothing like fresh white bedding to get you out of a bad habit!

Next up, the lamps.  Mine was cute but not his style, his was in need of TLC (it had never been dusted), plus they didn't match each other or the furniture.

I scoured Joss & Main, One Kings Lane, Crate and Barrel, HomeGoods, Kirklands, CB2, West Elm, Pottery Barn, Costco, and Ballard Designs, and nothing seemed quite right.  I finally found the perfect lamps while wandering around Target.  They sell mix-and-match lamps and bases, so I could pick out exactly what I wanted.
Not too formal, not too casual, not wood, not in a color, and it had to look sophisticated.  For $28 these definitely did the trick.  Another $25 for wavy barrel shades (I liked the texture), and PRESTO!


Seriously, who knew lamps had such variety?  And could be so expensive!  I'm sooo glad Target had just what I wanted at an acceptable price point.

My next goal in this room is to finish unpacking boxes and to add some art and photos so it won't look so boring.


Have you made any changes to your bedroom as you get older?  How do you make a space sophisticated without being too boring?

Wednesday, November 14, 2012

What's on your wallet? {plus discounts!!!}

I know I've been slacking on the projects lately, but a lot of that is due to the amount of time I've been spending researching and shopping.  Like for my husband's (new to him) car, lamps, a chandelier, and for the items I'm about to feature!

Bonnie Projects isn't typically a style blog, but I'm so excited about these new things that I just have to share!

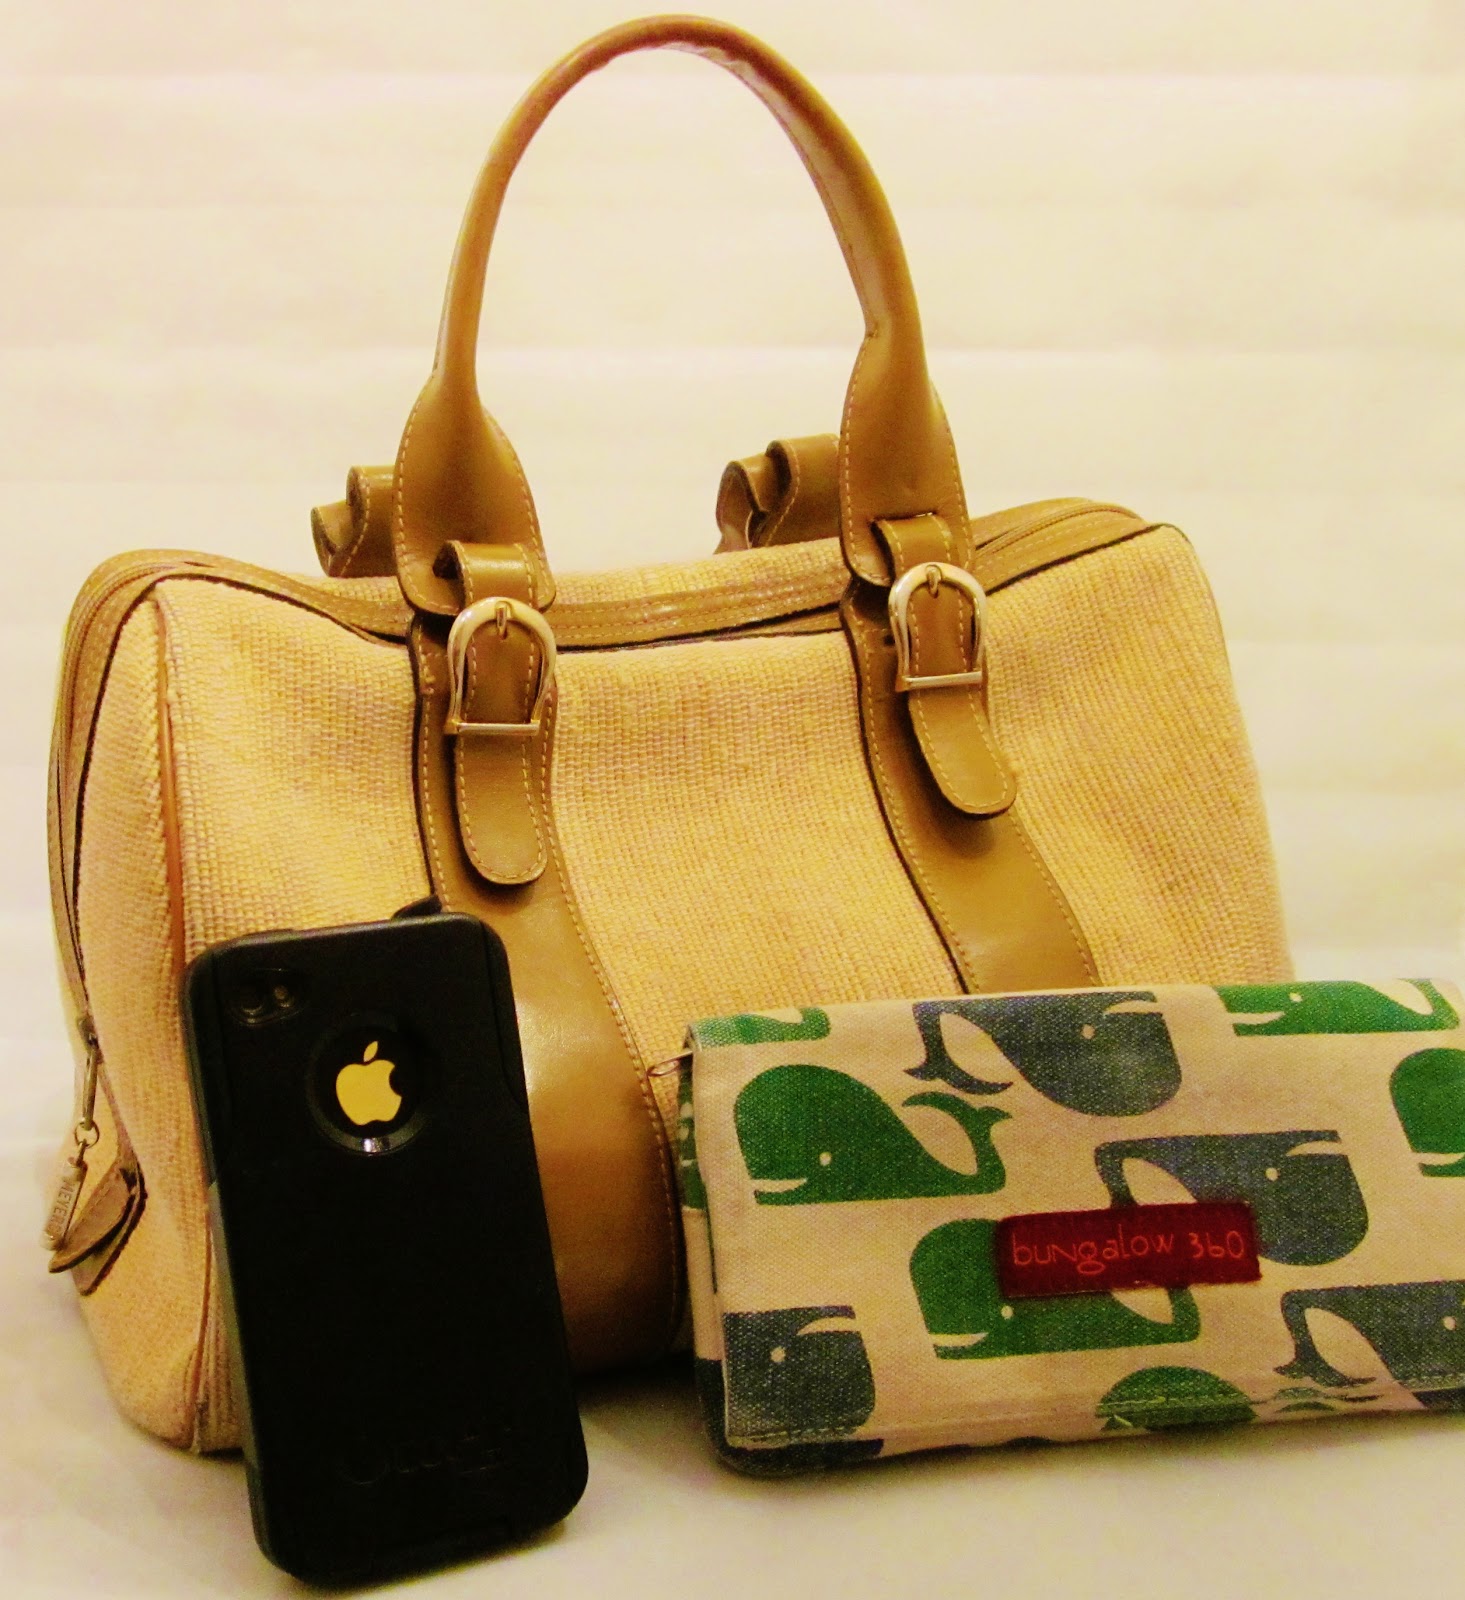
My birthday just passed, and all I really wanted was a quality purse (my last three fell apart in a matter of months), a fresh wallet (the old one was so dingy that even oxyclean wasn't cutting it anymore), and a cute iPhone case.

Here's what I was working with pre-birthday:


  • Doctor's bag style purse from Goodwill (it's in good shape, but I HATE the short handles and it never really lost it's eau-de-Goodwill, yuck)
  • Bungalow 360 whale wallet I've had for 4+ years.  Cute and functional, but it's definitely not white anymore even though I've run it through the wash a number of times.
  • Otterbox iPhone case.  Totally functional.  Totally boring.

They're all headed to Goodwill and hopefully someone else will find them useful!

I'll fess up, I searched for replacements for hours.  Went to the mall, checked out Target, DSW, Macy's, TJ Maxx, all the regular spots.  Nothing.  Then it dawned on my to try Etsy.  Holy cow guys!!!  Seriously, it's everything you could ever want and more.  And homemade, often in the USA.  And affordable.  Score!

Here's what I "asked for" for my birthday (does it count if you add items to your cart then make your husband check out?):


But wait, there's more!  Because I was so happy with my new finds, I contacted the shop owners who made these beautiful pieces, and they agreed to pass some discounts on to you!

Adele hand makes dozens of styles of leather bags, in an array of beautiful colors (hubs, are you reading?  I love the yellow!!!).  She'll also take custom orders.  She's offering 15% off everything in her shop for the month of November, just by entering NOV15 during checkout!  Seriously, you will love her bags, they are scrumptious.  Add one to your holiday wish list!


Faith on Earth makes wallets, checkbook covers, business card holders, and the like - all in adorable fabrics.  It makes me smile every time I pull out my wallet, and notice how cute it is!  She's offering a 10% discount through the end of December, just by entering 10OFFFAITHONEARTH at checkout.  Don't know what to get that hard-to-shop-for lady?  This.  You're welcome.


Dana unfortunately couldn't swing a discount on her iPhone cases, but her prices are already pretty competitive, so you're in luck!  These would also make excellent Christmas gifts or bridesmaids gifts, especially since they can be customized.


Monday, November 12, 2012

A silver sixpence for your shoe

If you're a longtime reader, you know that I had a silver sixpence in my shoe during our wedding.  My mother wore the same one in her shoe.

It's supposed to bring luck and wealth to your marriage, and it's in that well-known poem:

something old, something new
something borrowed, something blue, 
... and a silver sixpence for your shoe

I really love whole idea of the sixpence, so of course I wanted to share the tradition with my sister-in-law for her upcoming wedding.

They don't make sixpences anymore, but I managed to find one, and it's even from the year her mother was born!

To give it a special touch, I handmade a card to present it in.

Using my Silhouette Cameo, I designed the words and cut them out of scrapbook paper - antiqued paper for the "old", white roses for the "new", and of course navy blue!  It ended up being a happy coincidence that it came out to be her wedding colors of navy and gold!


I almost bought a high heel Silhouette pattern online, but I balked at the price and selection and made my own.  I googled some images of high heels, and used the tracing tool in my Silhouette software to get the shape.  My SIL loves pink, so I went with hot pink paper!  If she had chosen her heels by now, I would try to copy those.


I hope it brings luck and wealth to her marriage!
