Friday, August 31, 2012

Choosing Paint Colors

When we bought our house last month, we went into it thinking there weren't really too many projects we'd need to do - mostly some paint to get it feeling like "us".

What I didn't realize is that painting pretty much every single room in the house is a BIG project!  And one that I didn't have a lot of skill to prepare me for.  Don't get me wrong, I've painted many a room in my life.  But being frank, I've never really liked many of the colors I've chosen over the years.

I've never educated myself much in interior design, just put things together by trial and error.  This time around, with the paint, I'm really not interested in trial and error.  I want to get it right the first time!

The first thing I did was google "how to pick paint colors".  There weren't many websites on the subject, but I did see a number of YouTube videos (How to Choose a Paint Color, Choosing Paint Colors Like a Professional I and II, and How to Choose Paint Colors).  I watched about half a dozen videos on color theory and choosing interior paint colors and came away with the following:

  • There's a measurement called the Light Reflectance Value (LRV) that expresses the percentage of light reflected from a surface.
see more on color theory ay Color Budz
    • This is important, because LRVs of less than 50 can make a room look dark.  LRVs above 50 make a room look lighter.  We're choosing LRVs above 40 for our house; the rooms are on the small side and we want them to feel as large, light, and airy as possible
    • For a color to be easily distinguished from another (e.g. white trim paint), the difference in LRV should be greater than 20.  Many white paints have LRVs in the 80's, so in our house, we shouldn't choose paints with LRVs greater than in the 60's if we want them to look significantly different than the trim, which we do.
  • The color wheel means something!  Choosing colors from opposite sides of the color wheel can help them balance out.  Our house is FULL of orange-toned wood.  We're talking cabinets, floors, walls, trim, blinds, light fixtures, carpet...FULL!  To add some contrast to all these orange tones, it would be a good idea for us to use blue tones on the walls.
A very nice color wheel put together by Cornell
  • Using colors with grey in them was another big designer recommendation.  They were especially fond of colors that couldn't be described with just one word.  So "blue" should be avoided, but "bluey green gray" is something I should strive for.  The super bright colors (no grey) can apparently look childish or garish.

So by this point I'd narrowed it down to bluey/green/grey tones with LRV between 40 and 70.  But that still left a LOT of colors!!!

To further hone the selection, I sat down with my husband and browsed Houzz and Pinterest for inspiration.  We decided to start with the living room, as it's where we spend a lot of time.

pinned from The Inspired Room
pinned from Better Homes and Gardens

OK, so now we're looking for a bluey-green-grey, kind of in the turquoise family.

I went to Home Depot, Sherwin Williams, and the local Benjamin Moore carrier and grabbed a bunch of different paint swatches.  I taped them all to the wall, and sat back to have a look.

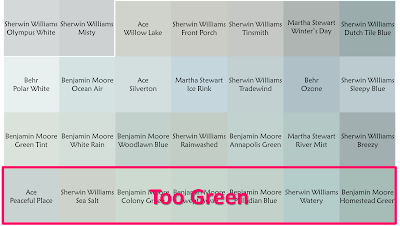
Blue Green Gray Paint Swatches

Some were too dark.

 
Some were too gray.


Some were too blue.


Some were too green.


But a few seemed just right!


I waited a few hours for the light to change.  Not only do we get nice indirect morning light, we also get direct afternoon light, sunset reflected off the lake, and artificial light.  We wanted to choose a color that would be nice in as many of those as possible.

That night, a few more were removed.  And another few the next morning.

Until finally I was left with one: Rainwashed by Sherwin Williams.  It's a greyed down turqoise with an LRV of 60 and RGB of R-194, G-205, B-198.  Don't be fooled by the online swatch - it's a little different in person!


Stay tuned for the when I paint the living room and the half-bath.

You might also be interested in these posts:
Living Room Updates
Half Bath Reveal
Kitchen Updates

Wednesday, August 29, 2012

Wedding Dress Wednesday: The Undergarments

 Wedding Dress Wednesdays are guest posts written by my Mom, Janet

Last week, I covered pattern making for the wedding gown.  But similar to how a quality blueprint doesn't ensure a strong house, a pattern won't ensure a beautiful dress!  Even the best-cut dress won't wear right if the support structure of the undergarments is off.

When building a structure, the underlying support has to be good quality.  Whether it’s a beautiful home, a lovely garden, or a designer dress, it must have the right support built into it.   A strapless gown with a heavy skirt is a prime example of this!


The bodice of Bonnie’s gown had the following layers built into it: 
  •  Top layer of lace
  • Taffeta to back the lace
  • Cotton under-layer so it wouldn’t be see-through
  • Cotton lining to feel ‘breathable’ next to her skin in 95 degree weather!

I sewed boning into the bodice panels, stopping at her waist.   I always trim the ends of the plastic in a slight curve, so it won’t be sharp.  I double stitch across the ends of the fabric channels, so prevent the boning from moving.  I made bias strips of the cotton fabric for the boning to ride in because I thought it would be less bulky than the readymade strips.  I also placed the boning in the dress with its natural curve in towards the body for extra support.  I made sure to stop the boning before any area that would be stitched and turned, like the neckline of the dress.  

curved-end boning partially inserted into pockets
boning sewn into pocket
After sewing the lining into the garment, I clipped the center front point of the sweetheart neckline, so it would turn inside out nicely.  I also understitched the seam allowances to the lining – this pulls the top layer of fabric slightly into the inside of the dress and prevents the lining from peeking out.


I made hanger loops of 1/8th inch ribbon and tacked them inside the side seams of the dress.  Due to the weight of the dress, these have to be sewn securely, going all the way through to the seams of the dress.  I sew the loops of the ribbon upside-down, facing the hem of the dress, to encourage them to hang down out of sight when you wear it.  This is a neat trick that I wish more off-the-rack clothing featured!

I started by building a well-fitting bra into the bodice.  I removed the straps and re-shaped the top curve of the cups so they wouldn’t peek out.  I sewed the bra into the lining by hand after having her try it on and carefully pinning it into place.  It looked fabulous, but unfortunately, cups in a dress don’t give you any real support, they just fill out the dress nicely.  

After a lot of trial and error, we removed the cups.  We were keen to prevent any wardrobe malfunctions on wedding day!  Bonnie tried on several ‘torture’ garments, like a lace up corset that only added bulk, and a body shaper thingy (girdle) that she called a crotchless torture garment!  
full-body shaper (= torture)

It technically fit, but wasn’t nearly tight enough to have any real effect.  Several strapless bras that tended to slip down when she moved also didn’t make the cut.  The best bet was the long-line strapless bra which, while not comfortable, couldn’t go anywhere and provided all the necessary support.  

long line bra (that's a model, not Bonnie!)
To give the skirt more body and fullness, I made a petticoat into the dress.  I cut a sub-lining skirt and sewed multiple rows of gathered, stiff, petticoat netting onto it.  I made sure the netting wasn’t longer than the skirt lining, because it is very scratchy!

underlining of the skirt, with petticoat made into it

Due to the weight of the flounces and the extra fullness that we added to the skirt, it tended to go between her legs when she walked.  We ended up buying a full petticoat to use in addition to my layers to keep the dress ‘poufed’ into the right silhouette.  

petticoat for wedding dress
In an ideal world, you should have all this stuff before you do any fittings, but you also have to have a make-do attitude and solve problems on the fly!  We had been working with the bra cups and sewn-in petticoat up until the very end.  We waltzed into a local bridal store the day before we left for the wedding to solve these lingering problems.  The owner welcomed us to bring in the dress and try on undergarments with it.  She was very helpful and knowledgeable and $150 later we were all set!

Because the dress had almost 40 yards of fabric in it, it was quite heavy, 5 pounds! If that doesn't sound like much, tie a bag of flour to your belt and let me know what happens!

Even though we had the bodice pretty tight, after Bonnie moved around, the dress seemed to go South, and had to be tugged upwards.  I HATE that! After a lot of discussion and tugging, we decided to make the side seams super tight right above her hip bones.  That way she could still breathe, but the dress couldn’t go anywhere.  This was a great solution and I didn’t see her tug at the dress at all during the night.  Yay!  {editor’s note: it also made my hips look tiny!}


Monday, August 27, 2012

Inspiration: All-White Wedding Bouquets

I've been asked to make bouquets and boutonnieres for TWO upcoming weddings! The first one is next week! You'll have to wait till 2013 for the second.

Both brides are interested in all-white bouquets. I've been searching for inspiration online, and wanted to share my findings with you.

There are loads of beautiful white and ivory flowers available, in the form of roses, peonies, calla lilies, lilies, carnations, mums, hydrangea, gardenia, ranunculus, snapdragons, dahlia and more. And of course, there are prices associated with each of these.

My bride really wanted peonies, but they're typically only available in the spring. This time of year, if you can even find them, they are incredibly expensive. Even in season, they're not cheap.
white peony bouquet
If the fluffy, delicate look of peonies is what appeals to you, you can get close by using garden roses or fully opened regular roses. Garden roses are about 30-70% cheaper than peonies, but regular roses are the most affordable way to go. Hydrangeas also give that fluffy look. Plus, not only are hydrangeas easy peasy to prep and assemble, but they are also quite affordable.

Once I told my bride about the peonies, she decided to go with garden roses for her bouquet and hydrangeas for the bridesmaids. {If you're thinking, "why didn't she just use yours?", I thought the same thing. But she wanted fresh flowers, and who can blame her, so we're doing fresh flowers! Besides, mine all scattered back home with my bridesmaids.}

Her wedding is in the Outer Banks, so I won't be able to use my go-to store, Potomac Floral. Thankfully, Norfolk is less than 2 hours away from the location and has a wholesale flower shop, Norfolk Wholesale Floral. I spoke with them on the phone to pre-order the flowers, and it seems like they'll have everything I need! Unfortunately, they don't supply pure white garden roses, but I was able to get regular roses at a great price. I'll make sure they open fully before assembling her bouquet.

Once I knew I'd be working with roses and hydrangeas, I got busy getting inspired! She wasn't interested in greenery built into the roses, so I avoided that. I'm only giving one photo, because honestly they all look quite similar!

White rose bouquet
White hydrangea bouquet
So lets review!


Where you can really customize an all-white bouquet is in the wrap. She's having a slightly rustic theme, with burlap table runners and lots of mason jars, so we decided to go with a twine wrap. Too cute! She really liked when a good bit of the stems showed, too.

white peonies with twine wrap

twine wrap where several inches of stems show
I've never done fresh bouquets with all one type of flower before, and I'm looking forward to it! Stay tuned for the final product...


Thursday, August 23, 2012

Pennant Thank You Notes

I was really excited about how our DIY wedding stationary turned out!  Because we did it ourselves, it was exactly what we wanted.

Well, when it came time for thank you notes, I was used to getting exactly the stationary I wanted!  I was pretty burned out after the wedding, so first I looked online for thank you notes.   While there are numerous cute options out there, nothing was quite right.

My Requirements:
  1. Affordable.  Sorry, but I can't pay $2+ per thank you note.  That's just crazy.
  2. 4"x6" size (or A6).  We want to write nice messages to our guests, and didn't feel like we could do it on a 3.5"x5" tiny card.  (This is what really started limiting the selection)
  3. Cute!  I didn't want to send out just any old card!

While endlessly browsing for cards, I began to get inspired.  I loved the blowflowers.   I loved the fireworks ones.  The ones with our photo would be cute.  But I really really liked the ones with pennants on them.  Besides, we had about a mile of pennants (or bunting?  I don't know) at the wedding, and maybe it would remind our guests of the night!

I mean, how cute are these?!?  They start at about $1 per card and go up from there.

1. Citrus Press Co, 2. Karen's Kreations, 3. Fresh Paper Studios, 4. Daisy Design Shop
So even though I finally found some cute options, they either weren't quite right or were out of my price range.  Cue the projects!

I started by ordering A6 blank notecards and envelopes online.  I wanted to be sure they were pre-scored for easy folding, but weren't already folded!  That way I could put them through my printer, and would avoid scoring them myself.  I found just the thing, affordably and using recycled paper, at Desktop Publishing Supplies.  I was also super smart and ordered self-sealing envelopes.  No more licking glue!!!

I initially tried using Powerpoint to make these because I'm really comfortable with the program.  I managed to make the string and some triangles, but all the angles looked too harsh somehow.

making the image in Powerpoint just wasn't quite right...

So then I went to Photoshop.  I will say right now, for the record, that there is an insane learning curve with Photoshop!!!  I couldn't even draw a line for the first hour!  About four hours later, I had the image I wanted, but it was super pixelated and I didn't know why.  I looked at some advice online, and it turns out I didn't have the image quality set properly.  Not that changing it would change any of the shapes you've already made...

messing around with image quality

So then I started over from scratch, but in higher image quality.  This gave me ample opportunity to practice all the line and triangle drawing skills I had just learned.  Another hour later, and I had the finished image!

Then I had to fight with my satanic printer for about half an hour.

wrestling with the printer to get a quality print job!

Finally got them printed out all pretty.  Now we just have to write in them!

Pennant thank you cards
pennant thank you cards

In the end, this project took about six hours and cost about $26 for 100 thank you cards (not counting ink) - bargain!  Wayyy more time than I had imagined, but I did pick up new Photoshop skills, and created exactly the cards I'd been dreaming of.

And if you want some for yourself, they're available in my etsy shop!


Wednesday, August 22, 2012

Wedding Dress Wednesday: Pattern Making

Wedding Dress Wednesdays are guest posts written by my Mom, Janet

Two weeks ago I shared how we designed the perfect wedding dress for Bonnie, and last week I detailed selecting the fabric. This week I'll discuss how I created the pattern for it.

I always told my clients that anyone can look fabulous, regardless of size and shape, as long as the dress fits properly and is styled to suit your figure. We designed Bonnie's dress to complement her natural body, with a long, fitted bodice to show off her tiny waist while not overpowering her petite frame. She looked ridiculous in princess-style gowns, and gowns with straps and sleeves made the dress seem to swallow her. Her high heels made her look taller.

When you look for inspiration, keep your mind on the general shape and fit of a dress. What key features do you want to copy exactly, and which ones can be sacrificed? For our design, we kept the overall silhouette, but changed the number of ruffles and the fabrics in the finished dress.

Once we had our inspiration dresses, we schemed and plotted to come up with a rough sketch for our creation. I went to the fabric store to look for a pattern featuring a bodice with similar lines. There wasn't a single one! I need to let the pattern companies know that they are really lacking in silhouettes that match what is available in ready-to-wear.

I guess sometimes it pays to be a pack rat; I still had a great pattern from 1988, Butterick 6208, in my stash from doing weddings. It was a perfect start for the bodice. Princess seams for super fitting lines, sweetheart neckline, and fitted down to the thumbs. It's a good thing the groom never saw the pattern - he'd have died!

Butterick 6208 (from 1988!): sweetheart strapless fit and flare dress with princess seams
Rather than cut up original patterns, I like to copy them onto tracing paper. It comes in large rolls, and is a very affordable way of using one pattern again and again. It's sturdy enough to draw and erase pencil marks, but is thin enough to pin through just like a store-bought pattern. Instead of cutting and retaping a pattern as I change it to fit a client, I can simply trace it and cut a brand new one. For Bonnie's dress, I went through lots of versions, slashing and adding and pinning and folding.

Pattern pieces for the bodice
Bonnie picked out a well-fitting bra that we sacrificed and cut up to provide the sewn-in cups for the trial bodices. One should always have proper undergarments for fittings. (Store bought cups are very limited in style)

Bonnie is petite and curvy, and store-bought patterns don't usually fit her, so we did multiple muslin trial bodices, mailing them across the country and even doing a fitting at New Year’s in Louisiana.

Somehow she managed to pin these trial bodices on herself, although I did insert zippers in them to help her get in and out of them easily. A lot of people don’t realize that if you can pin a wrinkle out of a sample dress, that same amount can be taken out of the pattern, and when the new piece is cut, it lays perfectly flat! My classes from college on ‘flat pattern designing’ have proven to be a godsend over the years.

Bonnie taking photos of what she pinned so I could get an idea of how it was fitting
While working out the issues with the bodice, I also started designing the ruffles. The ruffled effect in the inspiration dress is not actually made with true ruffles (a gathered strip), but instead from huge circles with the center cut out, like doughnuts. When the curved inner edge is straightened out it, the curved outer edge undulates into a flounce. I knew the general effect I wanted, and started by drawing circles on tracing paper and drafting the flounces.

Pattern for flounces
Then I pinned them onto the basic under skirt shape on the dummy to see how it would look. 1, 2, ... 5 versions later I finally got the right effect! I had figured that the dress companies would design the outer circle to be the full width of the fabric, but actually the inner circumference matched the bottom edge of the bodice, so – no seam on the first flounce!

First try at flounces - they needed more tweaking!
One feature we did copy from the store bought design, was that the flounces were sewn on in pairs - a wide one and a narrow one. At first it appeared to be labor saving, but in hind sight it wasn’t really.

Sample dress with the first set of ruffles pinned on
{If you just gasped because it's black, remember when we picked out fabric that we decided to make the practice dress in black so that we'd have a ball gown at the end, instead of an ugly muslin sample}

Each flounce was cut individually, and the outer edge sewn into a narrow hem. The inspiration photo showed many more rows than my sample, but since Bonnie is only 5’2”, we ended up with 9 rows.

Once I had a complete dress, I mailed it across the country to Bonnie. She sashayed around her house in it, taking notes on how it moved and laid when still. After her fitting, we made the train longer and the skirt sections flare more. At one point, we emailed some photos of the black sample to family to give them a sneak peek at the dress. Bonnie's Grandpa Jack didn’t understand, “it’s a black wedding dress?!?!"

Bonnie trying out the black sample dress
Check back next week when I talk about having the proper undergarments!  And after that, several more posts about shoes, the belt, beading, and the removable train!


Wednesday, August 15, 2012

Wedding Dress Wednesday: Fabric Shopping

Wedding Dress Wednesdays are guest posts written by my Mom, Janet

Last week, I discussed how we found inspiration for Bonnie's wedding dress, and how we used that to design a unique one for her.  This week, I'll walk you through how I found the perfect fabrics for the gown.

I initially shopped at Hancock's and JoAnn's for fabrics, but their wedding selection was very limited.  I had the best luck shopping in the Garment District of Los Angeles, where I live (many larger cities have fabric stores that are on a whole different level than the national chains).

That whole shopping experience was really remarkable!  I made five trips downtown over the months and always had fun once I got there (though the LA traffic on the way was anything but).  There were so many pretty things in great shops, but those were balanced by lots of tacky places with day-glow orange evening gowns and pink plastic sparkly bouquets.  Some shops specialize in beaded trims, rhinestones, bridal accessories, or even things like ‘bed in a bag’ deals.

Day-Glo orange evening gown
  The majority of the shop owners are older men with heavy foreign accents, all consummate salesmen! “Special for you today, pretty lady!”

A typical garment district shop - they pull tons of product out onto the sidewalk.
If one was open to ideas on designing an evening gown, there are some real bargains to be had.  But I wanted bolts of a particular shade of fabric - white!

Inside a garment district fabric store - it's packed so tight you can hardly move!
The inspiration dress was made from silk chiffon.  But the silk chiffon sold at fabric stores is too drapey and sheer for our needs - it wouldn't have given the right effect.  In addition, natural silks aren’t a true white, and a lot of cream and ivory fabrics have undertones that are too yellow.  The fabric I found with the proper “hand” turned out to be polyester taffeta that had a slight texture.  The one we settled on was ‘off white’, Formal Affair by Logantex.  Bonnie says it's the color of a peony.

I decided to make the sample (practice) dress out of black taffeta.  The fabric was identical in everything but color to the white fabric I found for the wedding gown.  Most people make a muslin (heavy cotton fabric) sample, but the fabric is generally so ugly that it's unwearable.  Muslin also wouldn't have moved the same way, and I wouldn't have been able to test out the ruffles properly.  By making the sample out of nicer fabric, we'd end up with a black evening gown instead of an ugly muslin sample.

Wedding dress fabric
I ordered two bolts each of black and white taffeta.  When it was all said and done, there wasn’t much left of the white fabric, and by the time I added lace, cotton for the lining and underlining, netting, etc. the dress had well over 40 yards of fabric in it! 

While shopping, I also perused the lace.  Some were cheap or fake looking, some too heavy and old-lady looking, some too shiny, etc.  I finally found some lovely lace, in the perfect color, lightly beaded, at $35 a yard.  SOLD!  If you're used to buying cottons, $35 a yard may sound high, but lace ranges anywhere from $5/yd. for very basic unbeaded to over $150/yd for heavily beaded.

While trying on wedding gowns, we decided against rhinestone beading.  While it did provide more sparkle, it also made the fabric look more silver in color.  I chose a lace that had only clear and pearl beading so that it would blend into the fabric better (so well that you can't even see it in the photo below).

I also found black lace for the black gown.  Rhinestones and clear beads on black lace gave an all-over effect of the fabric being grey.  To circumvent this, I got a lace with all-black beading.

Beaded white lace, beaded black lace
While shopping in the garment district, I stumbled upon a number of other goods for the wedding - 50 yard spools of satin ribbon for the tables and ribbon wands ($4), silk flower petals ($3), beaded trim for the belt ($35), the veil ($8), along with some yardage for myself I couldn’t pass up.

Rhinestone trim for wedding dress belt
Pearl trim for wedding dress belt
 Also, all this time I was shopping for flower girl fabric and cotton prints for the napkins and pennants, but that’s for a later blog. 

The process of designing, fabric shopping, and pattern making took several months, but I got it perfectly planned out before I ever cut into the real fabric. Next week I’ll cover pattern making, construction hints, and overcoming problems with fittings.  All in all it was a wonderful process and one I’m so glad we tackled together!


You might also like these posts:
Wedding Dress Reveal
Hand Beading a Wedding Dress
Removable Wedding Dress Train
My wedding dress broke but we fixed it!


Wednesday, August 8, 2012

Wedding Dress Wednesday: Designing the Dress

Wedding Dress Wednesdays are guest posts written by my Mom, Janet

When my daughter was little, I was fortunate to be able to stay home with her and work from home.  I majored in Home Economics in college and had sewn all my life.  I was trained to be an Extension agent, but when I graduated from college, no jobs!

I created my own job by sewing for the public a couple of years before Bonnie was born. I loved to “do” weddings, and usually ended up sewing dresses for the entire wedding party.  We would pore over magazines, choosing sleeves from one dress and a skirt from another to create a custom design for exactly what they wanted but couldn’t find in stores.  I did this for brides, bridesmaids, flower girls, Mother of the bride, etc. etc. etc.

scrapbook entry for one of my custom gowns

I think Bonnie grew up thinking people always came over to play dress-up!  I always told her “when you get married, I’ll make you any dress you want.” 

Well, life happens and I stopped sewing for the public and rarely make garments at all anymore.  I’ve gotten heavily into quilting, but that’s another blog. 

When Bonnie got engaged last year, we immediately went into “wedding planning mode”.  She lives in DC and I live in LA so we did lots over the internet and phone.  She had been watching “Say Yes to the Dress”, a show on TLC where the bride goes through an agonizing decision-making process to end up with the dress of her dreams.  She had seen a Lazaro gown on the show, and had that in mind as a starting point.

I have always recommended that my brides go try on dresses.  What looks good in a magazine may not be suited for your figure! 

So on a rainy November day during our Thanksgiving holiday in Alabama, we drove to Atlanta to try on dresses. We went to a lovely little boutique, Bel Fiore, and actually found a gown we both liked! It was a fit-and-flare style, similar to an A-line, but fitted to about where your thumbs would brush your thighs.  It had a sweetheart, strapless, 3D beaded lace bodice with a huge tulle skirt, and did wonders for her figure.  The price was reasonable, and we heavily debated just buying the dress.  The designer is Avera, and the style is Madonna.  They didn't allow photos without a deposit, so here's a similar dress.

similar dress to that from Bel Fiore
Then we went to a second appointment at Bridals by Lori, as seen on TV.  What a place!  She tried on dozens of lovely gowns, some priced as high as $9000, but the Lazaro she’d seen in a 2009 episode kept calling to her.  It was also a fit-and-flare, with a plain silk semi-sweetheart strapless bodice and flouncy ruffled skirt.  Once she had it on (even after being “jacked up”, where they complete the look with a veil and belt), the bodice on the dress seemed too plain, but we loved the skirt.  With a $3500 price tag, it definitely wasn't worth buying it and adding our own touches.  The MOB isn’t allowed in the dressing room, but I was making mental notes!  Silk chiffon, beaded belt ($600!), etc. etc.

Lazaro 3913

Actually, Bonnie admitted that if someone had told her “you have to wear ______ dress”, she would have been fine with it, but we felt we could do something better and more personal. 

She asked me if I would be sorry and feel hurt if we didn’t make it.  My friends all swore they’d never attempt such a thing, but I knew we could pull it off and really enjoy it.  

We decided to combine the best parts of the two favorite dresses – it would be a fit-and-flare, sweetheart strapless gown, with a beaded lace bodice and full ruffled skirt, completed by a beaded belt.

Check back next week to read about choosing the fabric for the dress.


Friday, August 3, 2012

A Summer Visitor's Guide to DC

Unfortunately, nobody pays me to write!  All opinions are 100% mine.

Washington, DC is the most touristy place I've ever lived!  It's been so much fun having friends move here for jobs long-term, and having friends and family come visit short-term.

I was recently asked to help out some friends with their itinerary for an upcoming trip.  My recommendation list turned out to be pretty extensive, so I thought I'd share it with you.

The qualifications were that they are a group of several adults and three teenagers, want to get a little off the beaten path, are staying in Crystal City, and don't want to go home broke.

What to pack:
  • Comfy shoes - You can easily walk 10+ miles a day here without even knowing it
  • Sunscreen - It's sunnier than you'd think!
  • Water bottles - There are water fountains all over, but it's expensive to buy water from vendors.
  • Hand sanitizer - The metro is germy.
  • Subscribe to Dealery DC to get a consolidated daily email of all of DC's Groupon-type discounts
  • Smart phone - Download the NextBusDC app so you know when the next metro or bus is coming, and use Google Maps for finding your way around.


Bonnie's Recommendations on DC Activities:

Touristy but worth it:
  • Shopping in Georgetown, plus cupcakes from Sprinkles
  • Newseum (the only non-free DC museum I've been to that I would pay money for)
  • Segway tours (I know they look dumb, but this was the highlight of my parents trip here!)
segway tour of DC
view from the Old Post Office Pavilion
  • Zoo (free!)
  • Nationals game (they're actually good this year!  Fireworks after Friday games, and several free concerts on Saturdays)
  • Lincoln monument (very romantic at night, too...)
  • FDR monument (very unexpected but lovely!)
  • Jefferson monument
  • Washington monument (but closed till 2014 due to the earthquake)
  • WWII monument

Off the Beaten Path:
See the monuments from your kayak!
  • Shopping at Eastern Market for local crafts and food
  • Bike riding - Our favorite way to get around DC! (There are rental companies and I think the bikeshare program has now been opened to tourists) 
  • Kennedy Center (fun shows, especially Shear Madness and the National Symphony Orchestra.  Also have free shows all the time.  Fabulous 360 views of DC and Arlington)
Enjoying a view of Georgetown and the Potomac at the Kennedy Center
  • Outdoor movies (in Crystal City, Navy Yard (near ballpark), the Mall, etc.) 
  • Watching planes take off and land at Gravelly Point Park
  • National Arboretum (especially their bonsai exhibit) 
My Dad with a white pine that's been in training since 1629
  • Simply exploring the city

Bonnie's Recommendations on DC Dining:

Ok, dining in DC is expensive!  Don't go anywhere with "bistro" in the name or anywhere that makes tapas - you'll be broke!  If you want my real opinion, eat breakfast in your room, and make sandwiches for lunch.  DC simply isn't known for having good food.  It's alright, but definitely not worth the price and time it takes away from doing other awesome stuff.  These are my recommendations for folks trying to dine casually without spending a million dollars.  Maybe another time I'll do a post on the more posh DC restaurants worth splurging on)


  • Eastern Market (food vendors, fresh fruit, delicious subs) <$10
  • Matchbox is really yummy!  I like the one in Chinatown or on Barracks Row $15-$25
  • Ethiopian (the ONE thing DC is known for, go to any near U street) <$20
  • Ben's Chili Bowl (good prices, quick, metro friendly, very historical) <$15
  • Vapiano (lots of Italian choices, but can get crowded with the happy hour scene on weekdays.  Decent prices and you don't have to tip like at a regular restaurant) $8-$15
  • Mai Thai in Old Town - good Thai food on the Old Town waterfront $10-$18
  • Paradiso Pizza in Old Town or Dupont $10-$20
  • Sweet Green - they have 9 salads they serve, that's it!  $8-$10
  • Pentagon City Fashion Mall (Loads of inexpensive options.  All the tour buses stop here)
  • Native American Museum (they have real American Indian food that I hear is really good!  Can't get that outside of DC!) <$10
  • Museums
  • Cupcakes (DC is known for their cupcakes)
  • Teaism (somewhat more ethnic and healthy food, plus huge tea selection) <$12
  • Pork Barrel BBQ (in Del Ray in Alexandria) <$12
  • Pat Troy's (very authentic Irish pub in Old Town) <$8-$20
  • Nando's Peri Peri (Peruvian chicken, very delicious, awesome sangria) <$12


    Have a wonderful trip!  And say hi if you see me!