Wednesday, May 29, 2013

Display a ticket stub collection

Update!!!  I found an easier way to do this!

Does your husband have huge collections of stuff that are generally unacceptable as art?  Has he been collecting these objects for over ten years?  Does he love going to events, such as sports games, concerts, and movies, and even have season passes to his alma mater?

What can you do with such collections, you ask?  Look no further!!!  I am here to show you how to make a collection of ticket stubs into tasteful decor for your home.

{All in jest - I love you Tommy!  But seriously, there's a widespread lack of ideas for displaying collections}

I have yet to figure out his shot glass collection, but I have figured out the ticket stubs!


I started with a 20" square IKEA Ribba frame in black.  Their black and white frames in this size are kind of like shallow shadow boxes, and leave about an inch between the glass and the mat.

Tommy helped me cut a slit in one side of the frame - we drilled holes, then connected them using the jigsaw.  I wanted to do a plunge cut with the circular saw, but it seemed really unsafe, so we passed.  Be VERY CAREFUL with this part, and get a partner to help you hold everything!


Cutting the slit messed up the frame a bit, so I touched it up with black acrylic craft paint.  The finish isn't the same, but it's going on the top of a frame, and we're short, so it's not like we'll see it anyways.


There's a square insert for the IKEA Ribba frame, and it was blocking my fresh-cut slit.  I pulled off one of the sides, and put the U-shaped piece back in.  They're stapled together, it was really easy to just pull it apart.

Lucky for me, I had a large 2006 Final Four flag that I taped to the mat to cover the hole.  In other instances, I bet a fresh piece of mat board or a poster or something would also work.

If you just throw all the tickets through the hole, they tend to just land on their sides and bunch up at the bottom - not so pretty.  Instead, I taped a bunch to the mat to create a pretty background.  Don't do this for all of them - save a few.


Then I put the frame back together like normal.


Once I had it hung, I inserted the remainder of my tickets.  Again, they'll bunch up at the bottom, so instead of putting them in one at a time, I would tape two or three together at odd angles, then insert that whole bunch.  That way they look a lot more interesting at the bottom of the frame.


So that's it!  The whole project took about an hour of labor, but spread out over time since I had to wait for paint to dry.  I spent $20 on the frame, and I already had the paint.  All those events on the other hand....let's just call them priceless.


I love that now we can see all these ticket stubs and remember all the fun events we've been to!  I also love that they're all corralled in a 20" x 20" space - they're fun, but not too juvenile.

Thursday, May 23, 2013

Low Country Boil for a Crowd {Recipe}

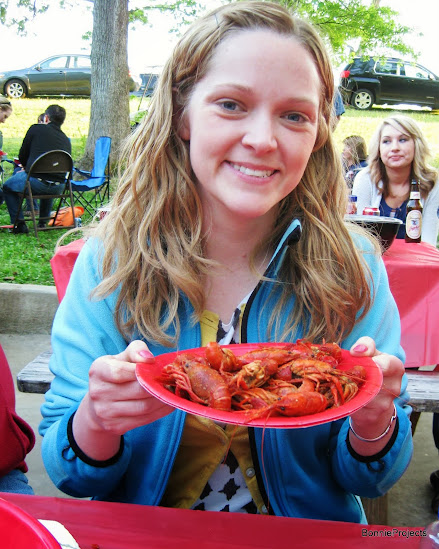
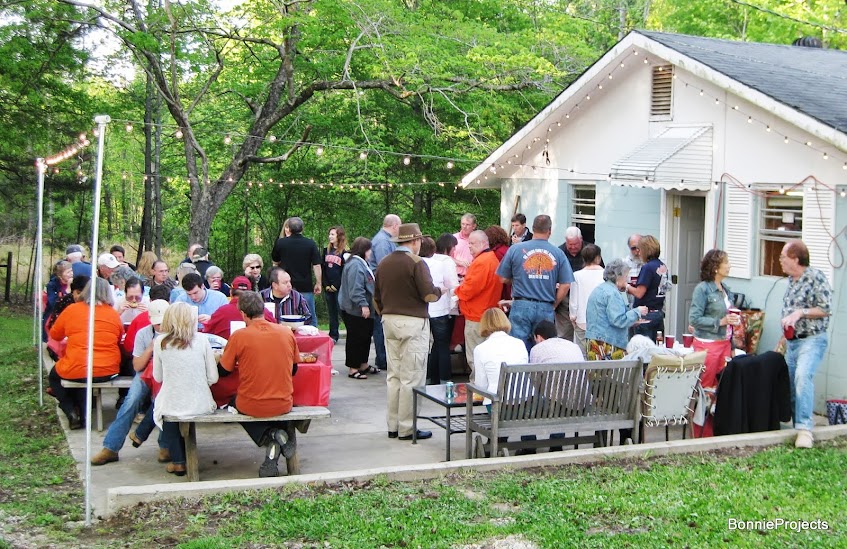
I recently visited my family farm in rural Alabama, where we gather up as many friends and family as possible for our annual Crawfish Party!

any guesses on how many people in this photo are my relatives?

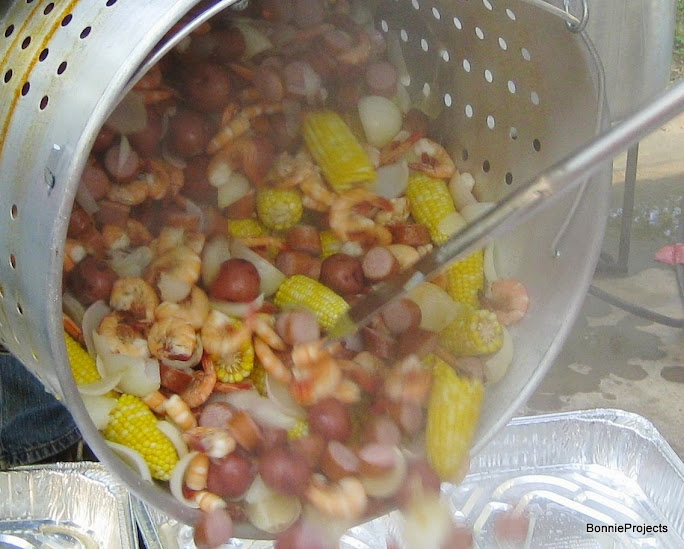
The crawfish are actually cooked in Louisiana and brought to the farm the day of the party, but the low country boil is made fresh!

yummmm, crawfish!

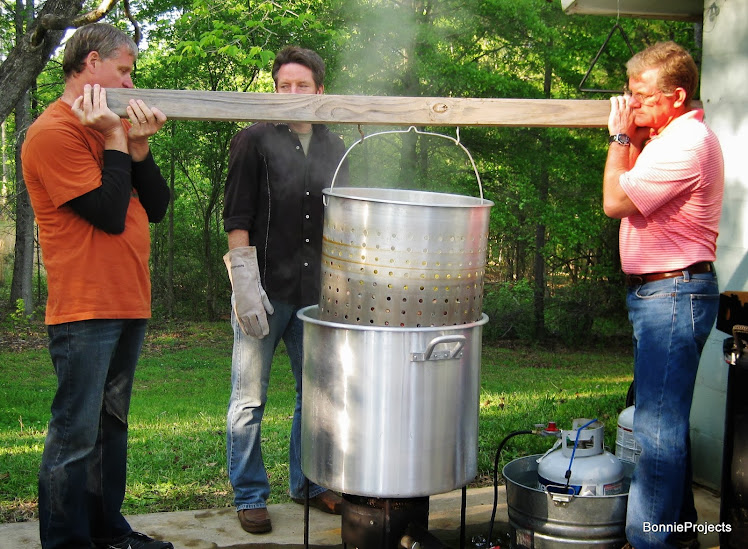
My uncle bought the largest commercially available pot (40 gallons) for the yearly event - if you need a bigger one, it's a custom order.  It's even bigger than the one I saw recently on Duck Dynasty (those guys have nothing on us!).  It's so big that I can fit inside, with the lid on!


For the normal kitchen chef, however, a large pot will do.  You only need a pot like ours if you plan to feed 75 people from a single batch.  If you're cooking for Louisianians, it may be more like 35 :)  The cool part is that with only one batch, everyone gets to eat at the same time.


Ingredients:
  • Red Potatoes (10 lbs.)
  • Corn (50 ears) 
  • Onions (1 dozen)
  • Seasoning (2lbs. Zatarain's crab boil powder + 1 lb. Swamp Fire powder OR 1 quart of Zatarain's liquid crab boil)
  • Lemons (optional)
  • Kilbasa Sausage (12 lbs.)
  • Shrimp (20 lbs.)

Method:

Fill your pot 2/3 of the way with water and bring to a rolling boil.  Our pot takes an entire hour and at least one tank of propane to come to a boil.  Also, the propane tanks freeze over, so they need their own bucket of water to sit in.  If it freezes up, the tank stops vaporizing and the fire goes out.

While you're waiting for the water to boil, prep the veggies.  The potatoes can go in whole or halved.  The onions should be quartered.  Remove the husk and silks from the corn, and snap in half.  Cut lemons in half.  Slice the sausage into bite-size rounds.  The shrimp go in whole, but it's a good idea to wash them first.

Once the water comes to a rolling boil, add the seasoning and start timing (or, if you like your potatoes and corn less spicy, add the spice later in the cooking process).

0 minutes: Add potatoes
10 minutes: Add corn
20 minutes: Add onions
25 minutes: Add sausage
30 minutes: Add shrimp
34 minutes: Turn off heat
37 minutes: Serve!

I know four minutes doesn't sound like much for shrimp, but overcooked shrimp get a gross texture and are also hard to peel.

Strain the water from the good stuff (we have an insert for our pot, but you could dump a small batch through a colander).  Using such a huge pot with so many pounds of food, we had to develop a special method for this step.  We have a 2x4 board with large hooks on it to get the pot out of the water - two people lift the pot.  A third person dumps the pot into aluminum trays - one for each table!


Serve immediately!

I like to dip my low country boil in a mixture of equal parts mayonnaise and cocktail sauce; others prefer cocktail sauce alone, or nothing at all!  It's up to you.  For the most part, nobody eats the onions or lemons - they're mainly there to flavor everything else.

When we have leftovers, we separate everything into baggies after dinner.  The potatoes make excellent home fries and are a delicious breakfast when paired with leftover sausage.  The shrimp can become shrimp cocktail the next night, or a Cajun pasta.  The corn freezes well and becomes a delicious corn chowder.

Lemon drop martinis or ice cold beer provide a welcome respite from the spice.  (And are best enjoyed in redneck wine glasses made from mason jars!)


I hope you enjoy our family recipe!


Monday, May 20, 2013

Reversible indoor/outdoor pillows

The freshly refinished patio furniture looks great!  But the solid blue cushions needed a little jazzing up.

I was complaining to my Mom about the dearth of cute outdoor pillows, and how the ones that are out there are pricey, and she suggested that she make them for me as a gift.

My specifications were three pillows, 16" square, and fun.  The rest was up to her!

She really hit the mark on this one!  She made us two sets of pillow cases.  We're going for a blue/green color scheme on the deck, so the main pillows are those colors.  She couldn't decide between fabrics, so she got both and made the pillows reversible.


So they can all match with either fabric, or be mixed.  What fun!


On top of that, she's well aware that Tommy's favorite holiday is 4th of July.  She made an extra set just for him in red white and blue that he can put out around Independence Day.  These are reversible too!


She used sunbrella fabrics, which stand up well to the elements and resist fading.  I used special outdoor pillow forms (half off at Joanns) to stuff them.  Even though her pillows measure exactly 16" square, they looked best with 18" pillow inserts.  The 16" ones were really puny, so keep than in mind when you're shopping.


Tommy was weirded out about having pillows that get rained on.  We got almost 1/2" the other day, but by that afternoon, they were already dry.  I would imagine they're also washable if need be.  You don't have to use outdoor pillow inserts - regular polyester-filled ones are OK too.

But wait, there's more!

After going on and on about how much we liked these, and after she saw our freshly painted blue porch swing, she made us two more!

These are also two sided, with a colorful chevron on one side and a flip flops print on the other.


A super big thanks to my awesome Mom!!!


Friday, May 17, 2013

Tips and Tricks for Potted Plants

After the disaster of trying to make a planter from stepping stones, I went back to looking for a planter for the yard that Lucky could pee on (instead of the yard plants, which were dying).

I found a cute lime green planter at Home Depot for about $20.  It's plastic, so it's lightweight and should hold up better to accidents (like being dropped).

One big problem is that it didn't have any drainage holes.

Not a problem for long!  I pulled out my drill and made a few holes in the bottom.  It seriously took all of two minutes.


The only thing with drainage holes like this, is that they sometimes get plugged up with sediment or soil.


Again, not a problem for long!  I just unfolded a coffee filter into the bottom.  If it can strain coffee out, I'm sure it can do the same for sediment and soil!  Plus it won't hurt the plants and will probably just become mulch eventually.  And, can we say CHEAP?


So, I drilled holes, added a coffee filter, then finished it off with good potting soil and plants.  I used orange begonias - they do well where I live, are very hardy, and make a nice pop of color.


{Y'all, when my parents see this post, they are going to say, "Begonias!  Bonnie HATES begonias!"  And they're right, sort of.  I really hated the look of begonias for a long time, and still don't really like them close up.  But from a distance, they're OK.  Plus all those other things I mentioned about about being hardy and colorful.}


Now we just have to train the dog to pee on it...


Thursday, May 16, 2013

Hydrangea Cupcakes

Today it's time for cupcake #3!  (Cupcake #1 was Raspberry Lemonade and Cupcake #2 was Triple Chocolate)

These are essentially a vanilla cupcake with fancy frosting, but they were light, fluffy, and delicious!  I thought these would be the "wah-wah" of the three cupcakes, but many people told me they were their favorite!  I guess you don't have to have fancy flavors to be good :)


via

Ingredients:
  • 1 box white cake mix
  • Eggs (do what it says on the box)
  • Oil (do what it says on the box)
  • Water (do what it says on the box)
  • 1 c unsalted butter (2 sticks)
  • 3 c confectioners sugar
  • 2 T milk
  • 1 T vanilla extract
  • Blue and red food coloring
  • Icing bag
  • 2D tip

Method:
  • Mix together the cake mix, eggs, oil, and water just like it says on the box.  
  • Fill cups and bake cupcakes exactly like it says on the box
  • Let them cool
  • Cream butter, milk, and vanilla extract
  • Add confectioners sugar and whip until smooth
  • Add more sugar or milk if needed to get desired consistency
  • Divide the frosting, and make one purple and one blue
  • Attach a 2D tip to your icing bag
  • Glop some blue frosting in one side of the bag, and some purple frosting on the other side (it doesn't have to be perfect)
  • Put little glops of frosting all over the top of your cupcakes, not leaving any space between them (this doesn't have to be perfect, either!)  The blue and purple will blend nicely and make your cupcakes look like hydrangea blossoms!
  • Serve on a pretty tray with a pretty label (it's all about the presentation!)
 

This recipe made about 12 regular and 24 mini cupcakes, and took about an hour of time in total (but I had to wash lots of dishes in between).

Don't be scared of icing bags!  They really are quick and easy, and people think you have amazing talent!


Wednesday, May 15, 2013

Project Fail: Planters from Pavers

While the glue was still wet on this project, I started writing this post...

The garden suffered a casualty over the winter: an oak-leaf hydrangea just couldn't stand up to the daily pee barrage of Lucky dog.  Honestly, I don't think any plant could.

We discussed asking the city for a fire hydrant, but decided that a statue or a planter would probably be more practical.  I've been shopping around for a while, but everything I like is in the $100 range, which seems a little steep for a doggie pee-spot!

Then I saw it on Pinterest - a planter made from stepping stones!  It would be cheap, easy, and durable - just my kind of project.

I was up at the hardware store that same night to buy all my goodies.  I got five 16" concrete step stones, a tube of Liquid Nails, a bag of potting mix, and an orange begonia, for a total of about $30 (and I still have soil and glue leftover!).  


Assembling the planter went super fast - like under 10 minutes fast.  I balanced the step stones on their sides, ran a line of glue down the side, and smushed them together.  I overlapped each stone only once, so the sides would all be the same.  I wrapped it in a bungee cord for good measure, but I bet clamps would be better.


Then I put dots of glue on the top inner edge, and smushed the fifth stone on top.  You use dots of glue here so that water can drain through.


I let it dry for three days, mostly because I didn't get around to moving it sooner.

Then....

I talked Tommy into moving it for me...that sucker was HEAVY!  About two steps into the garden, it crumbled.  Thankfully Tommy jumped out of the way and wasn't hurt.


So...definite project fail here.  Planters made from stepping stones = NOT WORTH IT!


Tuesday, May 14, 2013

Triple Chocolate Cupcakes

Today I'm back with cupcake #2!  (Cupcake #1 was Raspberry Lemonade)

These came out delicious, but not so rich they were overwhelming.

These were even easier than the raspberry lemonade cupcakes!  And just as delicious, but in a chocolatey way.  Again, I started with a cake mix - it saves time, and for me, they just come out better.


Ingredients:
  • 1 box devil's food cake mix
  • Eggs (do what it says on the box)
  • Oil (do what it says on the box)
  • Water (do what it says on the box)
  • 1 c unsalted butter (2 sticks)
  • 3 c confectioners sugar
  • 2 T milk
  • 2 T unsweetened cocoa powder
  • Chocolate garnish (I used chocolate curls)
  • Icing bag
  • 1M star tip

Method:
  • Mix together the cake mix, eggs, oil, and water just like it says on the box.  
  • Fill cups and bake cupcakes exactly like it says on the box
  • Let them cool
  • Cream butter and milk
  • Add confectioners sugar and cocoa powder and whip until smooth
  • Add more sugar or milk if needed to get desired consistency
  • Using a large star tip on an icing bag, make swirls on top of cupcakes (I go from the outer edge to the center)
  • Top with a chocolate garnish (it's all about the presentation!)

This recipe made about 12 regular and 24 mini cupcakes, and took about an hour of time in total (but I had to wash lots of dishes in between).


Thursday, May 9, 2013

Wedding in Review: All the Projects

To wrap up the Wedding Wednesdays, I wanted to provide a wrap-up post of all the projects!  I hope they've inspired you to DIY a few elements of your own wedding, whether it be to personalize, save money, or just to have something to do with friends!

PS: Friends, I still have most of this stuff, so if you'd like to borrow it for your own wedding, just ask!


The DRESS - designed by us and handmade by my Mom

My dress was a hand-beaded, Chantilly lace fit-and-flare gown with a strapless sweetheart neckline and rows and rows of flounces.  It also featured a button-off removable train and beaded belt.


Mismatched Bridesmaid Dresses
Personalized Bridesmaid Robes
Personalized Jewelry for Bridesmaids and Flower Girls
Flower Girl Dresses


American Girl Dresses to Match the Flower Girls
Flower Girl Baskets
Ring Bearer Pillow (made from leftover dress fabric)
Invitation Suite
Thank You Notes
RSVP Map

Will You Be My Bridesmaid Paper Doll Cards

Wreaths for the Chapel
Hydrangea Bouquets
Peony Bouquet and Ranunculus Boutonnieres
Ribbon Wands
Pennants
Pennant Cake Topper
Chair Ribbons
Ribbon Table Runners
Coastal Centerpieces Made From Lantern, Chrome Shells, and Coral
Chrome Coral Table Number Holders
Name Buttons
Photo Guest Book 
Cloth Napkins for Favors
Save-A-Guest Kit
Dancing Shoes