Tuesday, July 26, 2011

Cucumber Soup

In addition to pounds of eggplants and everything you'd need for a vegetarian lasagna, I've been getting ample cucumbers in my CSA share.  This fact, combined with 100+ degree days, makes cucumber soup a natural go-to.

As my mom says, "if you are what you eat, then I'm fast, cheap, and easy!"  This recipe fits those qualifications, as well as being healthy and no-cook!


Cucumber Soup

Ingredients:
1.5 c cucumbers, peeled, seeded, and cut into chunks
1 c plain yogurt (pick your own fat content)
1 T dill (though I've been using basil because I have oodles growing on my patio)
1 T olive oil (or less, you decide)
Salt and Pepper to taste

Throw everything in a food processor or blender for a few minutes and serve!  

This takes about five minutes start to finish, and makes 1-4 servings depending on how hungry you are.


Monday, July 25, 2011

Vegetarian Lasagna

I joined a CSA this year.  It stands for Community Supported Agriculture, and you basically buy a portion of the farm, and pick up your "share" of the produce every week.  We started with greens and root vegetables in the spring, but now that it's the height of summer the bounties seem endless!

I only cook for myself (and sometimes Tommy); what to do with all these wonderful veggies?!?!


My share this week had almost ALL the ingredients for vegetarian lasagna, so I went with that!

I combined recipes from my friends Aliya and Eric with a recipe from my Mom (adapted from the Southern Living Complete Do Ahead Cookbook) to come up with this one below.  While it seemed like a substantial amount of prep, it was very tasty and provided lunch for a week!  I discovered it's crucial to saute all the veggies first so the final product isn't too watery.  Tommy really looked at this askance when he realized I substituted noodles with zucchini and eggplant, but he ate two huge servings, so it must have turned out pretty well!!!


Vegetarian Lasagna:

Prep time: 1 hour, Total time: 2 hours
Serves 12

Ingredients:
2 large zucchini
1 eggplant 
1/2 pound fresh mushrooms, sliced 
1/2 c roasted red bell pepper, chopped 
1 c grated carrots
2 cloves garlic 
1 c chopped onion 
2 T melted butter
3 T olive oil 
2 c ricotta cheese
2 eggs, beaten
1/2 c fresh Parmesan cheese, grated
3 T fresh parsely
1 t dried oregano
1/2 t dried basil
15 oz. jar of your favorite spaghetti sauce
6 oz. can tomato paste (I used roasted garlic flavor)
2 roma tomatoes, coarsely chopped
2 c shredded mozzarella cheese

Directions:
1. Peel eggplant and slice thinly into large sheets (these and the zucchini become your noodles).  Salt and let sit in a colander for about 20 minutes.  Rinse and pat dry.

2. Peel zucchini and slice thinly into large sheets.

3. Saute eggplant and zucchini in olive oil in a large skillet over medium heat.  Set aside when done.

4. Saute mushrooms, roasted red bell pepper, carrots, garlic, and onion in butter and 1 T olive oil in a large skillet over medium heat until tender.  Drain and set aside.

5. Combine ricotta cheese, eggs, Parmesan cheese, parsely, oregano, and basil.  Stir well and set aside.

6. Preheat oven to 350.

7. Combine spaghetti sauce and tomato paste, stir well.  Spread half of this mixture into the bottom of a 13x9 baking dish.  Arrange eggplant "noodles" in a layer over the sauce.  Spread half the mushroom veggie mixture over the eggplant.  Spoon half the cheese mixture over this.  Repeat, but this time use zucchini instead of the eggplant.

8. Sprinkle chopped tomatoes over the top

9. At this point you can cover the dish and refrigerate for up to 24 hours.  Or you can immediately bake.  To bake, put in 350 degree oven for 40 minutes.  After the 40 minutes, sprinkle with mozzarella cheese and bake for an additional 15 minutes until bubbling and melty.  Let stand 10 minutes before serving.


(btw I generally think food pictures are gross, 
but I felt like I had to share to show it came out looking pretty normal)


Sunday, July 24, 2011

Project Eggplant

I've been getting pounds of eggplant in my CSA share, which for me begs the question - is eggplant really worth messing with?  My CSA donates extra vegetables to a local food bank, so I could easily just not take the eggplant part of my share and let someone else try their luck.

However, the adventurous side of me thought maybe, just maybe, there's something tasty that can be made from an eggplant.  And thus was born Project Eggplant.  I found four promising recipes and invited a few good friends to the party.  (I should interject here that more than a few people found really creative excuses not to come to the party - which is understandable.  But they totally missed out!)


The bounty

I made four dishes - Eggplant Dip, Eggplant Fries, Creole Aubergine, and Eggplant Parmesan.  All of the recipes are listed below, but I'll talk about them and show pictures first.  After making all these, it seems like the real secret to eggplant dishes is to salt the eggplant first so it sweats out the bitter taste and is better able to absorb flavors from your dish.


Creation 1: Eggplant Dip
I made the eggplant dip ahead so that my friends wouldn't starve when they first arrived.  It turned out ok, but we all decided that 1) if you have an eggplant, there are better uses for it, and 2) if you want a dip, there are better ones out there.  But if you have eleven eggplants and are trying to be creative, it's not a bad choice.

Eggplant Dip with Multigrain Crackers

Creation 2: Eggplant Fries
Everyone loved the eggplant fries!  Like the dip, I wouldn't go out of my way to purchase an eggplant just to make fries out of it, but if you happen across one, this is a fun way to prepare it.  The prep was fairly minimal for this dish, but like all things fried it took a while to cook everything, since you have to do it in batches.  

Eggplant Fried with Ranch Dressing

Creation 3: Creole Aubergine
I picked this recipe just because it had "creole" in the name and I'm from Louisiana.  This was by far my favorite dish of the night!  It took a good bit of prep, but the prep was in spurts.  You didn't have to monitor everything constantly, but you had to be in the vicinity for a good chunk of time.  This recipe was super flavorful.  I would even go out of my way to pay money for an eggplant just to make it again.
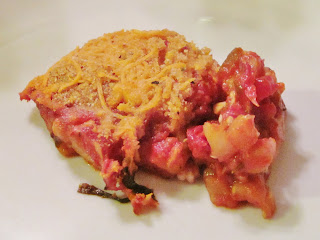
Creole Aubergine

Creation 4: Eggplant Parmesan
If you've ever eaten eggplant before, it's likely been in the form of eggplant parmesan.  This recipe was the top hit in Google, and had a 4.5 star rating on allrecipes.com from 1500 ratings.  I liked that it was baked, not fried, but I'm sure it's still incredibly unhealthy.  The prep on this one was intensive, but came in spurts like the creole aubergine.  My taste testers decided that this one also deserved of a rating of "I would pay money for an eggplant just to make this dish".

Eggplant Parmesan


And now for the recipes!!!  The Eggplant Parmesan was from allrecipes.com and the others were from eggplantrecipes.com.

Also thank you to my adventurous friends for trying out my "projects", as well as accessorizing our meal with local wine, a delicious death-by-chocolate cake, and juicy gossip!


Eggplant Dip
Ingredients:
1 eggplant (I used two of the long skinny purple ones and one white one)
4 T olive oil
1 onion, diced
2 T tomato paste
3 cloves garlic, minced
1 T lemon juice
Salt and pepper to taste

Directions:
1. Preheat oven to 350
2. Slice eggplants in half lengthwise.  Brush a foil-lined baking sheet with olive oil and lay eggplants face down.  Bake at 350 until peeling away from the skin (took me about 20 minutes)
3. Saute onions and garlic in olive oil until translucent
4. When eggplant is soft, scoop out the flesh and add with tomato paste and lemon juice to the skillet.  Simmer 20 minutes over low heat.
5. Allow to cool slightly and add to a food processor.  Process until smooth.
6. Season with salt and pepper as desired and serve at room temperature with crackers or pita chips.


Eggplant Fries
Ingredients:
2 medium eggplants (I used 3 white ones), peeled and sliced into french fry shapes
Salt
1 c milk
2 eggs
3/4 c flour
3/4 c self-rising corn meal
1/2 t salt
Vegetable or canola oil for frying
3 T Ranch seasoning mix (I used Tony Chachere's)
Ranch dressing

Directions:
1. Salt eggplant sticks thoroughly and place in a colander to drain for 20-30 minutes.  Rinse with cool water and pat dry.
2. Mix milk and eggs in a medium bowl.
3. Combine flour, corn meal, 1/2 salt, and ranch seasoning in a shallow bowl.
4. Dredge eggplant sticks in egg mixture then cornmeal mix and carefully place into hot oil.  Fry until golden brown.
5. Drain on paper towels and serve hot with ranch dressing.


Creole Aubergine

Ingredients:
1 large eggplant, cubed, sprinkled with salt, and placed in colander for 20 minutes (I used one large purple one)
2 T vegetable oil
2 T onions
3 T green bell peppers
3 cloves garlic, minced
1/3 c sliced mushrooms
1 can diced tomatoes
6 oz. can tomato paste
1/4 cup shredded fresh basil
1 t dried oregano
1/2 t dried thyme
1/4 t cayenne pepper
1/2 c cheddar cheese
1/2 c seasoned bread crumbs

Directions:
1. Saute onion and bell pepper in oil over medium heat.  Add mushrooms and cook an additional minute.  Add tomatoes and tomato paste to skillet and simmer 15 minutes.  Add herbs and simmer an additional 15 minutes.
2. Preheat oven to 350.
3. Bring water to a boil in a pot.  Rinse eggplant cubes and drop into boiling water.  Parboil 8 minutes or until tender.  Drain in colander.
4. Arrange half the eggplant in a 10x10 casserole dish.  Cover with half of the tomato mixture.  Repeat.
5. Sprinkle cheddar and seasoned bread crumbs over the top.
6. Bake 30 minutes or until bubbly.


Eggplant Parmesan

Ingredients:
2 large eggplants (I cut up two of the big purple ones, and didn't even use all those)
2 eggs, beaten
4 c seasoned Italian bread crumbs
Large jar (3 lbs.) of your favorite spaghetti sauce (I used Prego mushroom)
16 oz. mozzarella cheese
1/2 grated Parmesan cheese
1 T fresh basil

Directions:
1. Peel eggplant and slice into large medallions.  Salt thoroughly and let drain in a colander about 20 minutes.  Rinse with cool water and pat dry.
2. Preheat oven to 350.
3. Dip eggplant slices in egg then coat in bread crumbs.  Place in a single layer on baking sheets and bake 10 minutes on each side.
4. In a 9x13 baking dish, spread spaghetti sauce to cover bottom.  Place a layer of eggplant slices in the sauce.  Sprinkle with mozzarella and Parmesan cheeses.  Repeat these 3 layers until all eggplant used up, ending with cheese on top.  Sprinkle basil over the cheese.
5. Bake at 350 for 35 minutes or until golden brown.


Follow Me on Pinterest

Thursday, July 14, 2011

Wedding Flowers Practice

I'm making 16 centerpieces, 6 bouquets, and 18 boutonnieres/corsages for my friend's wedding!  Eek!  Given that I've never done such a thing before, I've been having some anxiety about my skills and what kind of time this is going to require.  To calm my nerves, I decided to do a trial run.

My training in the floral arts consists of two YouTube videos on hand-tied bouquets, a continuing ed class in floral arranging offered by Arlington County, and an article on boutonnieres.  I've also talked to a few friends and family who claim it's not all that difficult.  See?  Already an expert!  Practice makes perfect though!

I bought two mixed bouquets at Trader Joe's, one in red and one in white.  I didn't really like any of their other flowers, but needed a few more stems, so I collected some blue hydrangeas from my neighbor's yard.  Thanks neighbor!  Don't worry, the real wedding flowers won't include red and won't look so 4th of July!

The first thing I did was prepare the flowers.  I removed all the leaves and thorns from the flowers, as well as any damaged petals.  Then I cut fresh tips on all the stems and put them in water to rehydrate.  I'm anticipating that this portion of the project, when I do it for real, is going to take considerable time.  I'm getting 32 bunches in the mail!!!


I used the same bunch of flowers for all three projects, so I started with the bouquet because it required the longest stems.  It's easy to clump flowers together securely, but challenging to get them into a rounded aesthetic shape.  There are two schools of thought on securing the flowers - start with a few stems and secure each additional stem to the bunch with floral tape, OR just hold the entire bouquet in your hand and secure it all at once at the end.  I tried both, and the second option was easier and looked prettier.  Covering the floral tape with ribbon was super easy, and only used about 1.5 yards of 1" satin ribbon. 

The flowers I had ended up making a bouquet that would be a good size for a bridesmaid.  It took about 20 minutes to make, but that includes doing it twice, as well as not really knowing what I was doing. 

I recorded the height, width, length of stems, and length of ribbon handle so I'll have a good idea of what worked before when I do them for real.  I'm definitely going to start with the bridesmaid bouquets, and do the bridal bouquet last so I've honed my skills.


Then I disassembled the bouquet so I could use the flowers to make a centerpiece.  The flowers I bought didn't come with any greenery, so I had to make do without.  The flowers didn't want to stay in the vase very well, and I'm definitely going to need ferns to create a stable base when I do this for real. 

The centerpiece came together in about 15 minutes.  The reception tables are small, only seating 4-6 people, so I was pretty happy with the size of the arrangement.  It'll look fuller with greenery, too.  Again, I recorded measurements.  Yes, I am a statistician in real life!


Then I disassembled the centerpiece and got to work on the boutonnieres.  The idea here is a focal flower, a "bed" to go behind it, and maybe a few other interesting tidbits.  I didn't have many matching flowers, so I just played around and made a wide variety.  It was really fun to mix and match everything!  Boutonnieres allow for far more creativity than the other projects.  As an added bonus, it only takes about 2 minutes to make one!  Since I have 18 boutonnieres/corsages to make, this discovery was particularly important.


In summary, I've convinced myself that I am capable of doing this project.  I'm going to allow myself about 3 hours to prep the flowers, 3 hours to do the bouquets, 5 hours for the centerpieces, and 2 hours for the boutonnieres/corsages, just to be safe!  Wish me luck!

Lessons Learned:
  • The sale flowers at Trader Joe's are on sale for a reason.  Let's hope the flowers we ordered for the big day are fresher!
  • Floral tape is STICKY!!!
  • You need ferns to really make a centerpiece work
  • Boutonnieres aren't put in water, and wilt easily!  For this reason, I've decided to make the boutonnieres the morning of the wedding just to make sure they're fresh.  I'm also going to try to devise a way to put them in water.

What do you think of the products?  I'd love any suggestions for making them prettier, or any suggestions on making this project easier or more streamlined.  Feel free to share any horror stories so I'll know what to watch out for!


    Wednesday, July 13, 2011

    Waffle Bar

    For July 4th weekend I rented a lakehouse with some of my favorite people, including my best friend Katrina, my boyfriend Tommy, and a bunch of other friends, including fellow bloggers Maizie and Michelle.  I volunteered to make breakfast one morning, so I made a waffle bar!  (Thanks Jeff for the idea!)

    This turned out to be great for our big group, especially because they didn't all come to breakfast at the same time.

    I made enough batter to last the morning, and left that next to the waffle iron.  Folks got a fresh waffle, then added their toppings of choice.  I set out syrup, whipped cream, chocolate chips, walnuts, bananas, blueberries, and strawberries.  Pretty easy assembly, everyone got a fresh hot breakfast regardless of when they get up, and I didn't have to slave away and supervise for hours on end!


    How do you handle breakfast for large groups?

    Tuesday, July 12, 2011

    Small Cool Kitchens 2011

    I love reading the blog Apartment Therapy.  They have all sorts of inspirational posts, even some with DIY tips.  They're having a contest right now for small, cool, kitchens (<100 sq. ft.), so I entered my kitchen remodel!  Check it out and vote!


    I already got a comment...saying it's boring.  As an investment property that was meant to be rented out for several years and then sold, it was DESIGNED to be boring!  Oh well!


    I'm planning to write a future post about all the projects that went into the remodel, so keep an eye out.

    Monday, July 11, 2011

    Projects Weekend

    I spent the majority of this past weekend doing, what else?  Projects!!!  Let's just say that Tommy's been getting to spend plenty of time with the guys!

    Unfortunately, I can't share much about my projects with you just yet because all of them are gifts.  Never fear though, I will definitely blog about them in the future.

    Friday night I worked until 1:00AM on a project for the highly anticipated arrival of Richard and Lisa's baby!  It's so much fun to think about what she's going to be like, and how loved she's going to be, while working on a gift for her : )

    Saturday I hit what felt like half a dozen craft and fabric stores to shop for supplies for two projects for said baby, Tommy's birthday quilt, and Lauren's wedding flowers.  Don't worry, Chic Done Cheap, I had my coupons!!!  I spent the remainder of the day sewing, and I prepped all the vases for Lauren's wedding while watching episodes from season two of "24".

    Sunday was more sewing!

    I'd like to comment here that I find sewing super relaxing.  My Mom is a seamstress, and I've been hearing the whir of her sewing machine since I was in the womb.  I bought an identical model when I went off to college, so I'm still getting that same whirring 26 years later!  It's also nice to be able to call her up and have her walk me through maintenance and repair jobs, since she has the exact same machine in front of her.